Showing posts with label Oxford Impression. Show all posts

Wednesday, November 2, 2011

GC125: Farm Fresh

Well I have to say I'm sad to leave POE month behind on Gingersnap Creations. I love all the spooky goodness that was created and displayed over there!

November we head to ON THE FARM with a focus on seeds and beads.
Recently I've been loving the color block stamping, so I had to give it a try. And yes, I know it looks like the rooster is laying eggs (there was no hen stamp).

Stamps: Oxford Impressions COUNTRY GIRL
Ink: Amuse Studio inks; Archival Black
Paper: Amuse Studio kraft & Cherry
Accessories: red brads, 1/8" red line tape, sesame seeds, red Scrappers Floss

Hope you join us at Gingersnap Creations with your Farm Fresh creations!

Tuesday, May 24, 2011

GC104 - Denim, Dust, and Rust

Welcome to this month's color challenge at Gingersnap Creations - Denim, Dust, and Rust.


Gingersnap Creations has a great sponsor this month - Technique Junkies Newsletter!


For the very "splashy" modern background I used a Technique Junkies' method called Bingo Blast. But I substituted the new Distress Stains, for the bingo markers! Same effect but in the dusty, rusty colors of the old West. (I think it turned out very cool!)

Stamps: Oxford Impressions COUNTRY GIRL (photo); Stamper's Anonymous ODDS AND ENDS
Ink: Stazon black, Distress Ink Fired Brick
Paper: red cardstock, glossy paper,
Accessories: flower button, twine, Distress Stains (Faded Jeans, Antique Linen, Fired Brick), bottle cap sticker
Technique Junkies: Bingo Blast - April/May 2009


Don't forget to post your Denim, Dust, and Rust (blue, tan, rust) creation to the Gingersnap Blog before June 19th. You'll not only be qualified to be selected as a Ginger Gem, but also have a chance of winning the fabulous "Emboss or Die" CD from Technique Junkies and, for this final challenge, a two-year online only subscription to the fabulous Technique Junkie Newsletter. (That's so AWESOME!)

Thursday, March 31, 2011

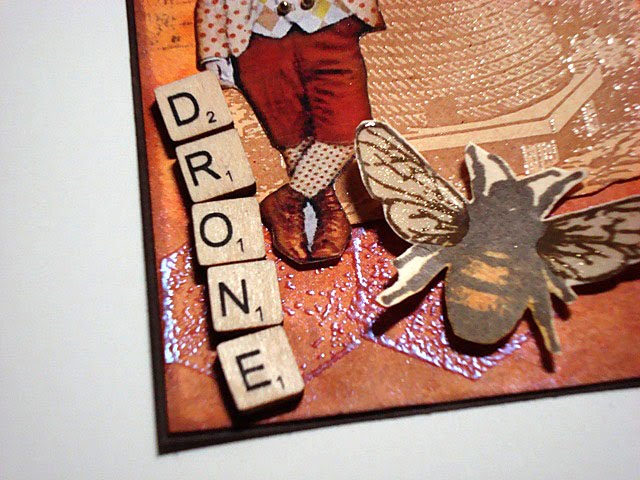
The Drone

I’ve been waiting on pins and needles to make this announcement! A few weeks ago I was invited to be a Contributing Artist to the Gingersnap Creations blog!! I’m SO honored to join these UBER talented artists for the next 6 months. Shortly, I will be updating my blog with direct links to the other Gingers. If you’re looking for grungy and/or vintage inspiration - visit them! And don’t forget there’s a weekly Gingersnap Creation challenge...

I created this copper/rust/ginger “bee boy” for my introduction piece. It felt great to be working with Distressed Inks again (I’ve been working with those FAB Amuse Studio inks for the past few weeks but I missed my DIs). It also felt great create a TAG again! :D

I found this great altered photo on The Land of Nod Studio’s blog – she has a Free Friday Photo every week. Since he was Gingery, he was perfect for my collaged tag. I also just got some new stamps from Stampotique that gave me the idea for The Drone. The rest of the tag is just classic “Tim” techniques with a little Glimmer Mist thrown in for sparkle! The honeycomb was embossed with a blue/copper EP called Terra Cotta.

Here’s a close up of the bee wing. I used a clear glitter pen on the wings before adding a layer of Crystal Effects. The end result is a sparkly wing.

Stamps: Artistic Outpost EPHEMERAL BACKGROUNDS (bkgd), Oxford Impressions LE JARDIN (hive), Stampotique bee & honeycomb
Paper: tag, photo paper
Ink: Distress Inks: Wild Honey, Rusty Hinge, Orange Marmalade, Vintage Photo, embossing ink
Accessories: ribbon, Glimmer Mist-Tuscan Sunset, clear glitter pen, Crystal Effects, gold pearls, Scrabble tile letters, Terra Cotta EP

So happy to be a Ginger!

Monday, December 13, 2010

Happy Birthday Heather!

My stamping buddy, Heather, celebrated her birthday last week. But she was out of town...I couldn't post her card until she got back. (grin)

Last year I did a "Heather" type card - you know that CAS (clean and simple) style that she does so well and I do so poorly?!?! This year I decided I needed to do a ME card. This background paper is Webster's Pages. The tag was a regular sized tag that I cut down. Images from Oxford Impressions.

I bought some natural paper gift card holders at Archiver's. This was embossed with a new folder and my Big Shot. I then sponged Distress Ink colors and smooshed some Stickles on it to give it sparkle. The butterflies were just added to tie to the card.

Wednesday, August 11, 2010

La Jardin Thank You

I couldn't get a good picture of this card...the light was just WRONG. (The shiny Bazzill card stock didn't help...)

Another Thank You card done! I was highly inspired by this tutorial by Julia Stainton.

The butterflies in white on the background paper were just that extra touch. The rest is pretty basic!

Stamps: Oxford Impressions LA JARDIN; PaperTrey Ink sentiment (Little Lady?)
Paper: Bazzill cardstock; Basic Grey PERHAPS
Ink: Distress Ink
Accessories: rhinestone, clear EP, Prima flower

Tuesday, June 8, 2010

Eggstravagnza!, pt 3

Again, no birds - just bird stuff!


Stamps
: Oxford Impressions "B"/THE BIRD'S NEST; Inkadinkado bird's nest
Paper: The Paper Studio MARABELLA;
Ink: Distress Ink: Tumbled Glass, Broken China, and Vintage Photo
Accessories: mini tag, water mister, Scrappers Floss, feather, glitter

Monday, June 7, 2010

Eggstravagnza!, pt 2

I noticed on the egg cards I'm posting that they have a "BIRD" theme but no birds! Today is another example (ok, there are little birds). I stamped the feather on a strip of French page paper and then hit it with some coppery glitter. The "B" was stamped with Broken China and glittery embossing powder.


Stamps: Inkadinkado feather; Oxford Impressions "B"/THE BIRD'S NEST
Paper: French page scrap
Ink: Distress Ink: Vintage Photo & Broken China
Accessories: Martha Stewart Birds on a Wire punch, glitter, glue pen

Tuesday, January 26, 2010

CAS Grunge??

So...what do you think?? (CAS) Clean and Simple Grunge or just Grunge??
I go back and forth. I had sudden inspiration on Monday night and had to jump out of bed (I was reading). I saw a cracked wall with a flower growing in front. My vision came out dead on. But I'm not sure this is CAS. Or maybe it's just not "clean". But "clean" is not about "white" in my thinking.

Stamps: Oxford Impressions LA JARDIN, Stampin Up EN FRANCAIS
Paper: tag
Ink: Distress Ink: Worn Lipstick, Shabby Shutters, Vintage Photo, and Walnut Stain
Accessories: Stickles

Monday, January 25, 2010

Not Published (this time)

So, when I first started my blog, I told you I was working on Easter submissions for a magazine. It was hard for me because everybody was working on Halloween stuff and I had the rabbits out! :D Still I sent off 6 entries to Stamper's Sampler with my fingers crossed (since it was my 1st submission).

This weekend my SS issue came and none of my cards were selected for publication. I have others in the pipeline. So while I'm disappointed it didn't work out this time - I'm hopeful for future issues.

Modern Grid Bunnies

Stamps: Denami Designs
Paper: Whisper White, orange
Ink: black
Accessories: glitter pen, ribbon and copics
Technique Junkies: Modern Grid

Chocolate Bunny

Stamps: Stamp Francisco: Rubber Baby Buggy Bumper
Ink: Distress Inks
Accessories: Ribbon, pearls, doily, Glimmer Mist

Arch Calla Lilies

Stamps: unknown
Paper: green, lavender, floral DP
Ink: Memento
Accessories: Glitter pen, copics, pearls

Bunny Parade - 10 Minute Card

Stamps: Oxford Impressions: CLASSIC ALICE
Paper: Neenah Solar White
Ink: Distress Ink
Accessories: none

Baby Chicks

Stamps: Oxford Impressions: COUNTRY GIRL
Paper: White
Ink: Distress Ink
Accessories: glitter, chipboard birds, paper lace

Alcohol Ink Handsome Hares - This is a Tim Holtz technique were AI is dripped on glossy paper and then sprayed with canned air to move it around.

Stamps: Stamp Francisco HANDSOME HARES
Paper: Whisper White, glossy white
Ink: Distress Ink
Accessories: Photo corners, Alcohol Inks

OH....And I've been working on CAS GRUNGE. More on that one tomorrow.

Tuesday, January 5, 2010

Oxford Impressions Christmas Card

Suzanne of Oxford Impressions had a contest on her blog before Christmas. I put a quick card together and sent it off. I was one of five winners!

I used my only Oxford Impressions "Christmas" set - WINTER SNOW. I collaged all the smaller stamps in the set as the background and used a Technique Junkies method called Burnished Backgrounds. The background color is a mix of Distressed inks. I stamped the boy on glossy white with Archival ink and heat set it. Then I tore a strip of white card stock and misted with Glimmer Mist. The Marshmallow spray gave the paper a real SPARKLE. But it also needed some Stickles along the edges (wink). Doesn't his expression say - "I just shoveled all this snow and here's another flake..." ??

Finally, I did a crystal snowflake at the embellishment.

Stamps: Oxford Impressions WINTER SNOW
Paper: white and glossy white
Ink: Distress Ink: FADED JEANS, BROKEN CHINA, WEATHERED WOOD; Archival Ink
Accessories: Clear embossing powder, Glimmer Mist: MARSHMALLOW, Stickles, and Crystal Snowflake.
Technique Junkies: Burnished Backgrounds

Saturday, December 12, 2009

Tim Holtz - Day 7 & 8

I think I finished my Christmas shopping today!! Unless I've forgotten somebody on my list, all I have to do now is wrap and mail!

Tim's Day 7 tag looked so involved and detailed...until I started reading. It's simple masking. I'm all for Tim selling his product with these tags (after all that's why he does them). But I have to day....BUY STICKY NOTES! for this! (eyeroll)

Once I figured out what he was doing with that fancy masking sheet....it was a simple matter to use the sticky note I always use and get on with it! After I sponged around Santa (and the mask), I used my aqua painter to give his face some detail.I added the pom-pom ball fringe because it seemed to need some green at the bottom.

Stamps: Stampers Anonymous LETTER'S TO SANTA; Cornish Heritage Farms/The Rummage Bin: WINTER VINTAGE SIGNAGE
Paper: tag
Ink: Distress Ink: Scattered Straw, Peeled Paint, Fired Brick; Archival black
Accessories: Button, Scrappers Floss, Snow Cap Dabber, gold embossing powder, aqua painter, and Stickles

Tim's Day 8 tag was beautiful. But here again (and I'm not the only one...I've seen the same comment on other blogs) what the heck is that key doing on his tag??? (another eyeroll).

I sponged my tag with Shabby Shutters/Scattered Straw and sprinkled water on the tag. Then I stamped holly sprigs in Peeled Paint. And put red Stickles over the holly berries. Then while that was drying I followed Tim's directions for the "parchment" vellum. The little girl was stamped with Archival on glossy paper and then watercolored with my aqua painter. And of course my trusty Martha Stewart holly punch. (grin)

Stamps: Oxford Impressions WINTER SNOW
Paper: tag, vellum, glossy
Ink: Distress Ink: Shabby Shutters, Scattered Straw, and Peeled Paint; Archival black
Accessories: Stickles, aqua painter, gold cord, and Martha Stewart Holly punch

Monday, December 7, 2009

Tim Holtz - Day 4 & A Crafty Secrets Card

Slowly catching up with Tim Holtz 12 Tags of Christmas. I didn't have all the parts for the gorgeous charm on Day 4's tag. So I changed the tag a bit!
Tim's background was very similar to a Technique Junkies technique called Burnished Backgrounds, so I used the TJ method. Which includes embossing the background images in clear before adding the color. After the color was dry I cut a window in the tag for the bubble window.

A close up of the window. I cut the oval in a scrap of paper first to get a good fit. Then drew it on the tag (after stamping and burnishing). I put tape on the back of the tag and then all round the edge to keep the glitter inside.

This is also my entry for the WINTER WONDERLAND Challenge on the Gingersnap Creations blog!

Stamps: Oxford Impressions WINTER SNOW, Memory Box
Paper: tag, Graphic 45 (snowman in window)
Ink: Distress Ink: FADED JEANS, BROKEN CHINA, WEATHERED WOOD, and BLACK SOOT
Accessories: German Scrap, clear embossing powder, bubble window, metal snowflake charm, glass glitter, clear snowflake buttons, and ribbon.
Technique Junkies: Burnished Backgrounds

I also worked on another challenge card using a Crafty Secrets image.
Every week on SCS, Crafty Secrets has a challenge (CSSC97). I've been taking part lately. The truth is I don't have many CS images, so sometimes it's a challenge. Last week's challenge was any CS image or stamp and 5 embellishments. I used Glossy Accents to apply the glitter around the edge. Last week when I used the tinsel glitter it didn't stick well. This worked like a charm!

Stamps: None
Paper: Bazzill cardstock, Cosmo Cricket
Ink: None
Accessories: Martha Stewart Holly border punch, primas, gold nailhead rhinestones, silk ribbon and glitter.

Sunday, November 22, 2009

Tag Tuesday Challenge #26 - Pink, Brown, Burgandy Christmas

After my busy week, I mostly took the weekend off! I did bake rolls & cinnamon rolls for Thanksgiving yesterday. Today, I'll admit to procrastinating. I do needlework finishing for one of my old store customers. I've been putting off working on it. My heart isn't in needlework at the moment - not even somebody else's.

But I did put the time to some good use...I worked on the Tuesday Tag challenge (I know...I'm a bit late with that too).

This week's challenge was the start of "COLORS OF CHRISTMAS: Pink, Brown, and Burgundy".

I started with a cream tag. I stamped a corner medallion (I don't think you can see it very well) in white acrylic paint and then brushed some of the paint in the middle. After that dried I sprayed with Glimmer Mist. Blotting and drying between each color. Then stamped snowflakes and words directly on the tag. The girl is stamped on glossy paper per directions from Oxford Impressions for a "picture" like image; and then cut out. Everything was then layered.

Stamps: Oxford Impressions WINTER SNOW; Penny Black CORNER PIECE
Paper: tag, glossy paper
Ink: Distress Ink: Fired Brick & Vintage Photo
Accessories:
Crystal Snowflakes; Glimmer Mist: Creme de Rouge, Creme de Cocoa, Creme de Chocolat; paper doily, rhinestone snowflakes, Martha Stewart postage square punch, Hearthwarming Vintage letters.

Monday, October 12, 2009

Alice in Wonderland

It's been a cold, blustery weekend. BUT! It's been warmer in the mountains west of Colorado Springs than in the Springs. Yesterday, I left home to go to an Archiver's class (10 Little Tags - really fun!) and it was 36-degrees and sunny. Before I got half-way down the mountain I had driven into fog/rain and it had dropped to 19-degrees. Fortunately, I got home before it all turned to black ice. It's been a mess this morning!

Did you know that October is National Book Month? And Oct 6th is Mad Hatter Day? Neither did I until the 3rd October challenge from the SCS Wish RAK group.

Challenge #3 is a sketch challenge, but in honor of Mad Hatter day I had to get out my Oxford Impression CLASSIC ALICE set. The background is the same technique from Technique Junkies that I used for my Fluffle Vampire: CREATEX CREATIONS. Createx is an airbrush paint. I'm not sure what makes it different from other paints but these ridges only seem to appear with Createx. This time I used gold and red, which is always stunning on black glossy paper. The Alice images are stamped in Memento and then watercolored with my aqua-painter and SU! re-inkers. I think it keeps the pen and ink drawings "original" - even if they weren't originally colored.

Stamps: Oxford Impression CLASSIC ALICE
Paper: SU! Basic Black & Real Red, glossy black card stock, Neenah Solar White
Ink: Memento Tuxedo Black
Accessories: SU! reinkers, aqua pen, and nail-head rhinestones.
Technique Junkies: Createx Creation


I've been working on a lot of "future" projects that I can't share right now. I have some deadlines looming right now but should be back to the "daily" post soon. Stay warm! (or cool!)

Tuesday, October 6, 2009

Tag Tuesday Challenge #19 - SHABBY CHIC

I love tags. They are my favorite medium to create! I recently came across Kard Krazy's blog that issues a Tag challenge every Tuesday. Today's challenge SHABBY CHIC. Shabby Chic means lots of things to lots of people -- to me it's an "aged" collage. Last night I had created the "watercolor" flower background working on another project (I used Tim Holtz's technique.) I had a flowery section left over and that became my jumping off point. The great thing about collage is that you can use up the scraps you have laying around on your desk. The fairy girl was a gift with purchase from one of my favorite ephemera sellers. The sentiment was stamped from La Jardin set by Oxford Impresions. A little layering, a little distressing with Shabby Shutters ink - and VOILA!

Stamps: Stampers Anonymous NATURE'S MOMENTS, Oxford Impressions LA JARDIN
Paper: tag, watercolor paper
Ink: Distress Ink: Shabby Shutter, Worn Lipstick, Dusty Concord
Accessories: ephemera, Prima flowers, pearls, and ribbon
Technique: Wet watercolor

Other news!

1) I dressed up the blog for Halloween? What do you think? :D

2) I was asked by my good friend, Kelly, to fill in on her Design Team since one of her ladies had to drop early. So be looking for future posting for
KL Stampin and Scrapin's blog!!

Sunday, September 27, 2009

The last Grunge Tags

Last night my SCS stamping buddy, Joanna, invited me to go to Archiver's with her for the Saturday evening crop. She told them that Friday was my birthday and they went all out. When I arrived I found a bunch of balloons tied to my spot. Later they gave me a huge cupcake and sang Happy Birthday (much to my embarrassment), and we had a GREAT time laughing and creating. I worked on cutting apart my niece's wedding invitation inserts and later my last two grunge tags (and a little shopping...).


This is my last number tag. I started with another "happy accident" background. This time I used Fired Brick, Pine Needles, and Old Paper for the base and CANDY APPLE RED Glimmer Mist over the mask. The rest of the tag is collaged starting with the Graphic 45 Santa and stamps from Oxford Impressions.

Stamps
: Oxford Impressions WINTER SNOW

Paper: tag, Graphic 45
Ink: Distress Ink: Pine Needles, Fired Brick, Old Paper
Accessories: Glimmer Mist: Candy Apple Red, flower, Stitcher's Floss, silk ribbon, acetate overlay, and number beads.

This is my last alphabet tag - L is for LEAF. The tag is crumpled up gently to distress it. Then rubbed with a Distressed Ink (Vintage Photo) and misted with water. The ink runs into the distressed crevices and leaves a wonderful rumpled look. After it was dried, I ironed it to smooth the tag. Using Mustard Seed and Spiced Marmalade, I stamped maple leaves (both a line stamp and a solid stamp) randomly. Over that I layered stripes of brown and print paper. The chipboard leaf was covered with another tag I had distressed in the same manner as the background tag. After cutting out I sponged the edge of the leaf. The "L" is grungeboard covered with a copper dauber.

Stamps
: Stamp Oasis (Rubbernecker) LEAF GROUP

Paper: tag, paper scraps
Ink: Distress Ink: Mustard Seed, Spiced Marmalade, and Vintage Photo
Accessories: Grungeboard, rub-ons, ribbon, chipboard, Paint Dauber: Cooper, velvet leaves, and brads.


And finally last week I did this spooky tag for #31. The background tag is my favorite water spritz background. Stamped with the TRICK OR TREAT web. The skeleton was stamped and sponged on another tag and cut out.

Stamps: Stampers Anonymous: TRICK OR TREAT
Paper: tag
Ink: Distress Ink: Mustard Seed, Dried Marigold, Spiced Marmalade, Black Soot, and Vintage Photo
Accessories: metal numbers, metal photo corner, ribbon, and staples.

Saturday, September 19, 2009

Queen of Hearts / Domestic Goddess

Two more tags for my Grunge Tag swap - the letters Q (for the Red Queen of Alice in Wonderland) and D & G (Domestic Goddess).

The King of Grunge is Tim Holtz - so I started with one of his techniques from April 2008. Patterned paper is stamped and embossed with clear embossing powder. Tim then covered with dark paint dauber. But when I did that it was too dark. So I just left the clear EP alone. It magnified the red color. Alice's Queen of Hearts was stamped in Fired Brick on another tag and cut out. Black/white papers were layered over the red diamond paper. Then I used some Grungeboard pieces. A heart covered in red Stickles and Crown painted with a silver metallic dauber

Stamps: Oxford Impressions CLASSIC ALICE
Paper: Basic Grey and Stampin Up! papers and tag
Ink: Distress Ink: Fired Brick
Accessories: Scrabble tile, Grungeboard, .Stickles, paint daubers, heart rhinestones, clear embossing powder, and ribbon.


Graphic 45 has a series of papers called DOMESTIC GODDESS but other than the title strips - I didn't use the paper. The background is another Tim Holtz technique from Day 7 of 2007 Christmas series. Here the entire tag is covered with Distress Ink and then clear embossing powder. When heated the EP creates an "orange peel" effect. The dents of the orange peel is rubbed with a darker color (Brushed Corduroy). The rest of the tag is collaged papers and clip art in celebration of the "cooking" Domestic Goddess.

Stay tuned for the laundress, seamstress, and many other talents of the 50's housewife... I'm really liking this topic and there's a lot more clipart to use!

Stamps: none
Paper: tag
Ink: Distress Ink: Broken China and Brushed Corduroy
Accessories: Crafty Secrets clipart, Scrabble tile, rope.

Friday, August 21, 2009

T is for..

...tan, terracotta, tea, teapot, and Tom Petty (aka the Mad Hatter).

I'm hosting a "grunge" tag swap on SCS. Yesterday as I was cutting apart my new Oxford Impressions' CLASSIC ALICE set, I was inspired to create this tag for the letter T.

For the background I used a Technique Junkies technique called DEPTH OF FIELD with the teapot stamp. Then I layered some scrap papers along the bottom. Distressed the edge of the tag and then layered the image of the Mad Hatter (also from CLASSIC ALICE). I finished the tag with chipboard letter, Dew Drops, Grungeboard, and a button.