Showing posts with label Tim Holtz. Show all posts

Thursday, April 12, 2012

Rogue Redhead: Chemistry Lesson

It's Rogue Redhead Thursday!

It's no secret that I love Tim Holtz's techniques! And like many of you, I enrolled in Chemistry 101 for a few lessons. I haven't completed all the classes just yet. But one or two of the techniques inspired me to get out BITS and PIECES and FLORICULTURE.

This first tag is "Spritz and Flick". Sponged color and drops of water. I used Broken China, Scattered Straw, Rusty Hinge, Spiced Marmalade, and Brushed Corduroy.


This second tag was a "WOW" gotta try that technique. Tim calls it "Archival Resist". I used Archival Sap Green, Olive, Monarch Orange, and Saffron. Tim sponged his creation with a brown Distress Ink and I thought it looked dull and lifeless.  So I used Scattered Straw and a little Spiced Marmalade.

Monday, February 13, 2012

Valentine's Day Cards 2012

This year for Valentine's Day I did a matched set of cards. All "alike" in that they share the same papers and elements, but different because the paper varied so much in the words spread across the paper.

I started with my Tim Holtz cupid die and cut a bunch of them out of red glitter paper. I cut some cupids facing right and others facing left. Just flip the paper over (wink)!

The cards are all 4x4. With a bit of paper doily and red grosgrain ribbon. Simple but fun!

Thursday, December 15, 2011

Tim Tag 2011 - Day 12 (The Finale!)

Well, we come to the end. Tim posted his twelfth tag on Monday, but I've had family issues that absorbed Monday and Tuesday. I finally got my twelfth tag done last night but it was too late to post it.

So here we are! I loved Tim's colors! And the little house (his looked like a surfboard for the angel tho...) I decided to just stay with the houses.
I free cut them out of grungeboard. I had blue German Scrap already (so no need to invent some). And I went with simply typed words. (Did I tell you I bought a typewriter a while back?? Sooooo retro!!) (grin)

I am so happy that I completed all 12 tags this year! That's a first for me. I've been taking them to work and hanging them on my cube wall. EVERYBODY stops by to see the new tag each day. It's been fun!!

Sunday, December 11, 2011

Tim Tag 2011 - Day 11

Day 11...wow...it's almost over for another year. I liked Tim's tag for today but I'm not a fan of making shrinky-dinks. I don't like how they curl. And if I have any shrink plastic right now, I have no clue where it is.

So I did my own thing today. My only inspiration was his color palette, and in the end I ditched that too!

The background is "spray & smoosh" with Broken China and 2 Glimmer Mists (Marshmallow and Turquoise Blue). Then did some stamping with found objects in white & silver. Since I ended up with a modern palette of colors I decided to go with a cute image from Whipper Snapper. Colored with Copics and glitter pens. I added some Flower Soft polar white but you can't really see it (even in real life).

So..tomorrow is the finale.

Saturday, December 10, 2011

Tim Tag 2011 - Day 10

Today Tim was all about faux mercury glass. Which I love! This is a fun technique. Packing tape transfers work best with vivid colors, so these are a bit washed out. But it goes with the mercury glass feel.

The background stamp is from Red Lead. Distress Inks are Brushed Corduroy, Pine Needles, Red Barn, and Scattered Straw. I added a little vintage tinsel (also by Red Lead) and some red wire hangers.

Only two days left!

Friday, December 9, 2011

Tim Tag 2011 - Day 9

Wow...I really like Tim's Day 9 tag and I like mine better! (grin)

I liked that Tim's tag looked like vintage wallpaper, so I looked for a similar stamp. I don't think I've ever inked up this Stampabilities motif stamp. But it was perfect for this tag. I used Victorian Velvet and Shabby Shutters.
I made mine more feminine with the doily and flowers (a Prima set from several years ago). The letters I painted with Glimmer Glam. It's my first time using that, it's got great shine but I wish the brush were bigger/longer!

Looking forward to Day 10!

Tim Tag 2011 - Day 8

Ok...I didn't get my tag done yesterday. I got home and fell asleep during dinner. I needed a night off!

I really liked Tim's Steampunk tag...but it didn't say "Christmas" to me. So I used the same background technique (love arcylic resist) and collaged a postcard to Santa!The Distress Inks I used are Tim's new holiday collection (Festive Berries, Evergreen Bough, Iced Spruce - LOVE THEM!!). I also sprayed the background with Marshmallow Glimmer Misty - it adds a snowy white sparkle. Santa was stamped with Festive Berries then clear embossed and also sponged with Festive Berries.

The lights I colored with Red Pepper alcohol ink. I had the idea and then saw that Ellen Huston's Classroom also had the same idea (she used Copics). Great minds!!

I'm off to get some dinner, then work on Tag #9...

Wednesday, December 7, 2011

Tim Tag 2011 - Day 7

Whew! I'm so relieved that Tim is back on his game today! I LOVE THIS TAG!!!

I changed a few things up. I used my favorite technique for the background - the "spray and smoosh". Tim calls it Wrinkle-free distress. I stamped swirls and red postmarks in the background for interest.

I've been waiting all year for him to demonstrate uses for the kraft glassine paper. I'm really inspired and can't wait to play with more of the techniques in his video.

The sentiment is one of my favorite Amuse Studio sets - Vintage Holiday Greetings. If you're interested in ordering contact Chris.

Ready for Day 8!

Tuesday, December 6, 2011

Tim Tag 2011 - Day 6

Ok. Let me just say...I hate Tim's tag today. It's messy. It's sloppy. To me, he called this one in...

My challenge was to do something I liked out of the un-inspiration of Day 6. AND I LOVE WHAT I DID!!

I was looking thru my embossing folders and came across this musical note folder. And I remembered my resin birds - and BANG! I was inspired.

I don't have the big wide sheet of heavy foil Tim had, but I've had this roll of flashing tape for years. It's shiny. It has an adhesive backing. It's cheap. You can find it in the hardware store near the venting materials. The only down fall is that it's 2-inches wide. But I just laid two strips together and when embossed you don't really notice the joint.


What I disliked most about Tim's tag was the messy paint dabber painting. So, I colored the tag with my COPIC R29. Since Copics are alcohol based they act just like the Ranger's Alcohol Inks. Better yet..since Copic has like million colors you can get the EXACT shade you want (if you have it that is...).


The alcohol dries quickly but leaves the metal tape feeling a bit sticky. After I used the sander to remove color and distress the tape, I sprayed it with Workable Fixatif.


Here's my resin bird. I also colored with Copics.


The branch was a Prima product which I just hot glued to the tag. Added some ribbon and "Merry Christmas" - which is part of a Memory Box stamp. I also spot colored that with a Copic directly to the stamp.

Here's hoping Day 7 is more inspiration...

Monday, December 5, 2011

TIm Tag 2011 - Day 5

I love Tim's technique today...but it doesn't love me! I've have tried the alcohol ink/Archival ink removal technique 3-4 times now. And I ****FAIL**** miserably every time! And today was more of the same.

In the end I created an AI background. Then I stamped silver snowflakes but didn't try to remove the ink. In the end I covered that with silver glitter too. A quick layer of spray fixative and it was ready to layer on paper (you can't really see it in the background) and decorate.

The decorations are a wreath made of holly tinsel; a Red Lead sled; and a grungeboard snowflake covered with glass glitter. I added silver balls around the wreath. The sentiment "I'm dreaming of a White Christmas" was a last minute add because the tag needed one more thing. (wink)

On to Day 6....

Sunday, December 4, 2011

TIm Tag 2011 - Day 4

Well, Day 4 is coming to a close and I'm finally done with my version of Tim's Day 4 Tag.

Mine looks a lot like Tim's but is different in the following ways:

1) I used pre-cut grungeboard pieces I've had for 3-4 years now. (See, I am using my supplies!!!)
2) I didn't have the number dies but didn't like that part of the tag, so I used some of the grungeboard holly that was on the same sheet as the snowman. Everything was colored with paint dabbers.
3)I like the acetate snowflake border but I think I'd like better out of a sparkle paper (next time...)
4) I used a mesh flower I've had for a while now...I like that bit of silver!
5) I added a bit of POLAR WHITE Flower Soft. Another supply that is just sitting here waiting for me to drag it out!

So, back to work in the morning. We'll see if I can keep up this next week! (grin)

PS...Happy Birthday to my niece, Jessica. Her card will be posted on Thursday!

Saturday, December 3, 2011

TIm Tag 2011 - Day 3

Every year Tim does a tag I'm not so crazy about. I'm not afraid to say I don't like Tim's Day 3 tag much. I think it's just too simple for my tastes. So I set out to do mine a bit differently!

It started with the technique. Tim created his own stamp pad. And while I did that last year (and really liked how it turned out), it's not my favorite technique. So I took the same stamp and spot colored it with Distress Stains! Before I embossed it I sponged Wild Honey and Vintage Photo around the entire tag (that Wild Honey makes it GLOW). THEN I embossed it. The trees and deer where stamped on other tags using Vintage Photo and my new Holiday color - Evergreen Bough. The deer was also roughly heat embossed with "Antiqued Silver". All the other supplies I got at Red Lead Paperworks. If you don't know Red Lead check them out!! BECAUSE THEY HAVE FABULOUS VINTAGE FINDS!

See ya tomorrow!

Friday, December 2, 2011

TIm Tag 2011 - Day 2

So this was a pretty quick tag. Tim's Day 2 tag was pretty simple and retro today.

I didn't have Tim's kraft paper but I did have the holiday collection. I love the vintage Santas. I had the deer die Tim used today, but I decided to use the lamp post.

I decided to use the felt snowflake and a calling card "SNOW" from Red Lead. Similar to yesterdays but I really like this. The holly leaves were covered in Rock Candy Stickles. And I sprayed the tag with Glimmer Mist Marshmallow.

See ya tomorrow!

Thursday, December 1, 2011

TIm Tag 2011 - Day 1

YEAH!!!! The day is here! I love this time of the year - Tim is doing his 12 Tags of Christmas. The Day 1 tag is elegant!

I have sworn NOT to buy ANY SUPPLIES! But to use what I have. I don't want to replicate Tim's tag but use it as inspiration.

So here's what I did have - the tag Die and the pine cone die; and the pearls. Everything else is a substitute. I used grungeboard precut letters and some green glitter (an off brand I got at the Expo). I used Amuse Studio paper because it has that nice white core that shows thru when you sand it. And I had some coffee-dyed ribbon a friend sent me for my birthday a few years ago. I had bought some great "vintage" embossing powder that was white and gold mixed...I love the flecks of gold!

So! Day 1 is complete. Can't wait for Day 2!

Wednesday, November 30, 2011

Stamper's Sampler - Neon Valentines

I got that fun package in the mail last week. The one that says, "Congratulation! You've been published in Stamper's Sampler." I'm still waiting for my subscription copy, but since Tim starts his 12 Tags of Christmas tomorrow...I needed to get this posted!!!!!!! (GRIN)

I have to tell you about the paper, the bird is stamped on. It's a napkin!! I pulled the two sections apart, glued the lime/raspberry napkin onto white paper then stamped the bird. The stamps are Purple Onion.

I love this card. The background was a scrap I had from the Fred Mullett class I took last year (year before?). When the challenge was NEON Valentines, I knew this piece would work. I don't remember who makes the stamp...it's a California shop.

This is a small 3x3 card. Stamp is Amuse Studio.

This was the pinwheel challenge. I *HAD* to put pinwheels on my favorite girls! I love this Lost Coast stamp!

I'm going to try my best to keep up with Tim this year...yeah, I know I said that last year and failed. But it's a good goal! I'm also taking Christy Tomlinson's The 12 Artsy Ornaments of Christmas. Not so sure I'll be doing those but I liked her list of visiting artists.

Monday, October 31, 2011

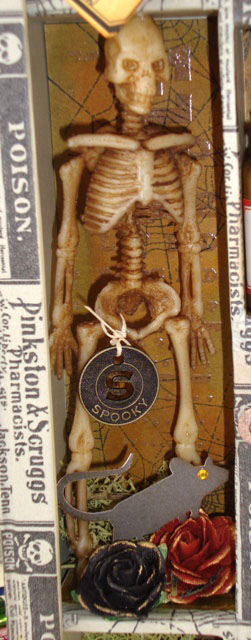
Dr Paine's Apothecary

I've been dying to do a shadow box and/or Configurations box. So I asked Pat, the owner of ONE LITTLE SPARK, if she'd be ok with a Configurations box. There isn't a lot of stamping but it does use a lot of goodies! She said yes right off.

So I started collecting goodies to go in the box. Surprisingly, (or maybe not) this time of year it's very easy to find cheap spooky stuff.

Here are most of my class ladies with their finished pieces. I was very happy they all got done in 2 hours!! Pat, the owner, is on the far left and I'm in the middle back.

So some close-ups:
Monkey Paw. One of the gals tore strips of Sticky Back Canvas and wrapped it around the boney fingers for a Mummy Hand.

A spider created a web in an empty hole.

Apothecary bottles.

Dr. Paine's shingle...

Skeleton and goodies.

Mouse (Martha punch).

Mini skulls

Raven.

The greenery behind most of the goodies is "reindeer moss", which I found at Hobby Lobby. It's very moist and flexible when it comes out of the bag. But I noticed today that it's dried out now. It's even creepier...

HAPPY HALLOWEEN!!! Be safe!

Sunday, October 30, 2011

A Murder of Ravens Class Cards

WOW! What a great weekend I had at ONE LITTLE SPARK teaching (and taking classes)!

Here are the classes cards from a Murder of Ravens.
THE RAVEN - we used the same photo transfer technique I did a tutorial on a while back. Stamps by Hero Arts & Stampers Anonymous.

THE SENTINELS - The tag background was done with Paint Dabbers - Lemonade, Butterscotch, and Mushroom. Stamps by Memory Box.

THE NIGHTWATCH - I love this one...so FAST! The background is a tag covered with Peeled Paint & Wild Honey Distress Stains. The image is a Mrs. Grossman's laser-cut sticker.

THE RAVEN - This is a good old Tim "Spray and Smoosh" background. Stamps Memory Box & Stampers Anonymous.

Tomorrow DR PAINE'S APOTHECARY!

Wednesday, October 19, 2011

A Murder of Ravens & Dr Paine’s Apothecary!

Today’s Random Redhead Challenge at Gingersnap Creations is RAVENS! And it’s the perfect tie-in to the class I’ll be teaching at ONE LITTLE SPARK in Little Egg Harbor, NJ this SATURDAY, October 22nd!
This tag is one of the projects in the class – A MURDER OF RAVENS. All the cards/tags in this class have a raven theme.

Here’s the class description: Did you know a flock of ravens is called a "murder?" Neither did we until Deb shared her fabulous Halloween class designs with us! You'll learn tons of great new techniques, while making gorgeous cards and this great tag in her Murder of Ravens class.

The 2nd class I’ll be teaching is Configurations Box where we’ll create DR. PAINE’S APOTHECARY – full of creepy crawly potions! I don’t have a full picture of the box but here are a few highlights.


Here’s the class description: Using products from Tim Holtz and 7Gypsies (just to name a few) you'll have a blast creating this fabulously spooky curio cabinet!

If you live in the area, I hope you’ll join us! And a special thanks to Heather for taking such great pictures of my stuff!

Friday, July 15, 2011

Sewing Machine

Today on the Gingersnap Creations blog, I have a tutorial.

When I first saw the machine theme for this month, my first thought was SEWING MACHINE! I love the look of stitching on cards. It adds such a nice, subtle detail. But I've spent the last 3.5 months (we get the themes very early on) pondering what kind of tutorial to do for the SEWING MACHINE.

I mean....you either own a machine and know how to use it OR you don't own a machine and it's a mute point. Right?

Then this past week I learned the COOLEST photo transfer technique in a class I' m taking and the ideas started rolling around. So forgive me for taking a slight turn...I promise to include the sewing machine too!

These are just the close-ups of the piece.

Stamps: just a clock stamp...but I can't remember what company
Ink: Distress Ink (Pumice Stone and Fired Brick)
Paper: 6x6 manila square, 7 Gypsies LILLE paper, sticky back canvas (ATC sized)
Clip Art: Dezinaworld Steampunk 4
Accessories: 7 Gypsies rub-ons, Tim Holtz gears & mini bottles, Stampin Up! mini tag punch, red Stampers Floss, red glitter, sequin waste, red wire, Tim's tiny attacher, sewing machine/red thread, Copics, black reinker, mini brads.

The image is a Dezinaworld clip art photo on sticky backed canvas. I also used Tim Holtz gears, mini glass bottle, and some 7 Gypsies rub-ons. And some red glitter for "time in a bottle". (wink)

A few more rub-ons, sequin waste, and red wire wrapped into a coil.

I hope you'll stop over to Gingersnap Creations and read the tutorial!!

Saturday, December 18, 2010

Tim's 12 Tags of Christmas - tag #6

So...did you notice how much Tim's Day #6 tag looked like my Day #3 tag?

I'm just saying...trees...deer...hmmm.

Ok, there were differences but still. (GRIN)

Not wanting to repeat myself, I decided to take a different path. Tim's lesson was all about using the texture embossing plates and I had the snowman. I tired his stamping over the negative image to make it look like the snowflakes were behind the snowman. I played around with the sponging and used SNOW QUEEN Glimmer Mist for shine. I ended up putting Rock Candy Stickles on the snowman and outlining him with a white gel pen.

To add the dimension Tim had with the deer, I did one of my crystal snowflakes. The sentiment was a $1 special from Mike's.

Yesterday, I visited my local stamp/scrapbook store. They had just gotten in this new glass glitter - YUMMY stuff! It's big and chunky. And looks amazing on the snowflake!

I've never heard of this brand but I'll be looking for their stuff in the future.