Showing posts with label Stampendous. Show all posts
Friday, June 25, 2010
Tag Tuesday #57 - POSTAGE
Louise's challenge for TAG TUESDAY this week is POSTAGE! My "postage" is a sticker from a new set by K & Company.
I found the tag background in my pile of 'created but not used'. It was a watercolor smoosh background, but the tag was paper (not manila tag). So the water soaked thru and didn't mix well. And it warped the paper badly. But I stamped the STAMPENDOUS rose stamp over and highlighted by sponging with distress inks. I used a white gel pen to add some brightness.
Even after mounting this tag on a card stock mat - this paper tag is still warped. I think that's why the background was in the 'created but not used' pile.
Wednesday, June 16, 2010
Didn't Publish
My friend, Heather, convinced me to submit these cards to Paper Crafts STAMPING ROYALTY contest. I had my doubts, but did it. I love Paper Crafts magazine but they really aren't my style of cards. As I expected none of these made the cut (grin).
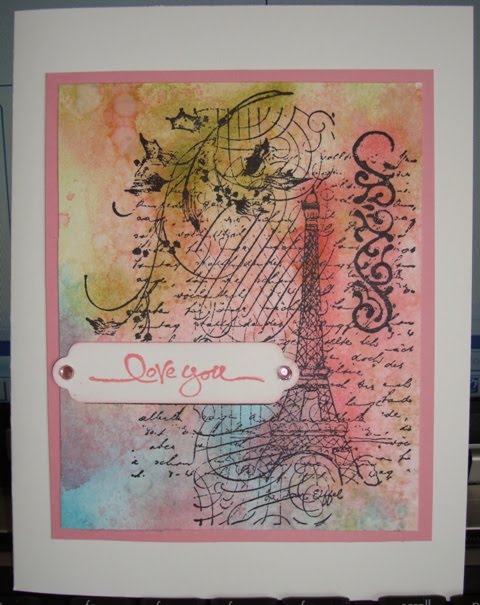
LOVE - this was a Distress Ink background - smoosh 'n' spray. The stamp is a Christmas stamp but other than a bit of holly on the spray and the sentiment it's great stamp. The sentiment was Stampin Up! I used a small sponge to highlight areas of the image
Stamps: Penny Black CHRISTMAS IN PARIS; Stampin Up! SHORT AND SWEET
Paper: Pink & white card stock
Ink: Distress Ink
Accessories: Nesties & rhinestones
HELLO/THINKING OF YOU - the image was colored with Copics and cut out. The rest is just that great Basic Grey ORIGINS paper.
Stamps: Stampendous SCENIC SUNFLOWER
Paper: Basic Grey
Ink: Memento
Accessories: Nesties, rhinestones, Copics
THANK YOU - Stamped the bamboo image on plain card stock. Then layered the HAIKU paper. The doll image was colored with Copics.
Stamps: Hero Arts FOUR DOLLS and ASIAN FRAMES
Paper: Stampin Up! HAIKU
Ink: Memento and VersaColor BAMBOO
Accessories: flower, Copics, pearls, border punch
CHRISTMAS - I love this Santa! It's such an iconic image. I stamped with Distressed Ink and no other color.
Stamps: Rubber Stampede SANTA COLLAGE
Paper: Graphic 45
Ink: Distress Ink
Accessories: Prima flower, Martha Stewart punches, ribbon
Stamps: Penny Black CHRISTMAS IN PARIS; Stampin Up! SHORT AND SWEET
Paper: Pink & white card stock
Ink: Distress Ink
Accessories: Nesties & rhinestones
Stamps: Stampendous SCENIC SUNFLOWER
Paper: Basic Grey
Ink: Memento
Accessories: Nesties, rhinestones, Copics
Stamps: Hero Arts FOUR DOLLS and ASIAN FRAMES
Paper: Stampin Up! HAIKU
Ink: Memento and VersaColor BAMBOO
Accessories: flower, Copics, pearls, border punch
Stamps: Rubber Stampede SANTA COLLAGE
Paper: Graphic 45
Ink: Distress Ink
Accessories: Prima flower, Martha Stewart punches, ribbon
Friday, May 14, 2010
Tag Tuesday #51 - Inspiration from Home
I love Louise's (Kard Krazy) Tuesday Tag challenge. It's a tag! So that had me. This week's challenge is "INSPIRATION AT HOME". My inspiration came from a book I just brought home - TAKING FLIGHT by KELLY RAE ROBERTS. I found it on the sale rack at Micheal's this week. What caught my eye were the ladies on the front but what made me buy the book was the incredible backgrounds and collages inside!
These three tags were all background experiments. All three were done with Dabbers (Raspberry, Citrus, and Pink Sherbet) and Glimmer Mist (Key Lime Pie, Dazzling Diamonds, and S.W.A.K.)
This background was done by rubbing the Pink Sherbet Dabber up/down the right side. Then I sprayed the other side with S.W.A.K. Glimmer mist. The green targets are the Citrus Dabber just lightly touching the tag and rolled. Below the dress I stamped Hero Arts SWIRL FRAME "inked" with Raspberry Dabber. The dress is Stampington & Co AUTHENTIC PARTY stamped on the new Cosmo Cricket DeLovely paper. "SPUNK" is a Basic Grey rub-on.
I think this is my favorite of the three. Again I rubbed the Pink Sherbet Dabber on the tag. Then I lightly rubbed the Raspberry Dabber along the edge. And sprayed with Key Lime Pie Glimmer Mist. And out came my mini bubble wrap again with Citrus Dabber. The large circles are a lid. The Hampton Art SMALL FACE FRAME was done on white paper in Archival Black. She looks like a Geisha to me. The lip and iris were colored with Copics (RV06 & YG13) and covered with Crystal Effects. The wings are Grungeboard covered with Pink Sherbet Dabber and Magenta Stickles.
This background is layered Glimmer Mist. Spray on a Teflon sheet and smooshed. Then dried with the heat gun. Repeat for layer after layer. Then more bubble wrap in Citrus Dabber. Finally I used Hero Arts LE LETTER stamp "inked" with the Pink Sherbet Dabber. The Stampendous RUFFLED BLOOM was also stamped on the same paper as the dress. Magenta Stickles and green glitter pen.
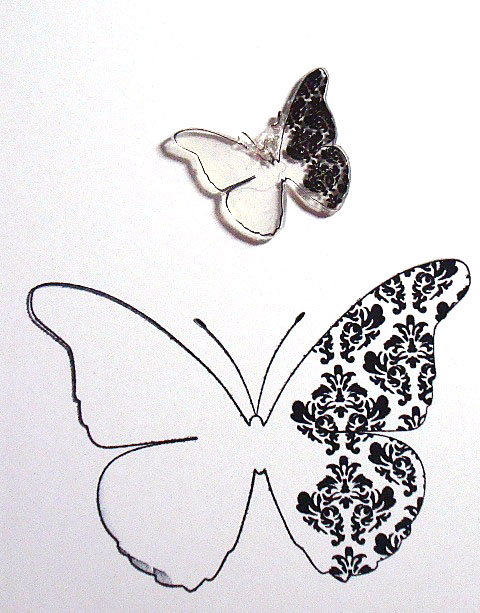
The butterfly in the corner is the new Memory Box Damask Butterfly stamped on shrink plastic and heated down to size. TIP: While the shrink plastic is still hot flatten it with a clear acrylic block. The rolled edges will lay down. I used the Citrus Dabber to color the back.
So, I'm down to 997 tags....
These three tags were all background experiments. All three were done with Dabbers (Raspberry, Citrus, and Pink Sherbet) and Glimmer Mist (Key Lime Pie, Dazzling Diamonds, and S.W.A.K.)
So, I'm down to 997 tags....
Tuesday, April 20, 2010
Deb's Recipe of the Month Club - April
Time again for Deb's Recipe of the Month Club! My grandmother made the best banana bread. It was moist, had an incredible crust, and I still crave it to this day. When I use her recipe, it comes out dry and nearly tasteless. I live at 9000 ft (more or less), so I expect that's the reason. My sister lives a sea level and her's comes out just like Grandma's. So instead of an old family favorite this time, I went searching for a Banana Bread that would work at 9000 ft (and sea level). And didn't find one. I did find this Martha Stewart recipe. The first time I made it, the top collapsed (but it tasted good). So I researched adjustments for high altitude baking (less baking soda and more flour). Honestly, it's the only recipe I've ever had to adjust. I don't even adjust box cake mixes (the few times I use one).
Stampendous monkey seemed like the way to go for Banana Bread. Colored with Copics. My bananas are slivers of circles. I clipped the ends of both sides and highlighted with a brown Copic marker.
I put the other version of the recipe (either regular or high altitude) on the back.
Stamps: Stampendous Changito
Paper: Basic Grey, Reminisce GOIN' BANANAS paper
Ink: Memento
Accessories: Copics, circle and leaf punches, glitter pen, and rhinestones
So, here's the 3rd batch of the high altitude version. Looks yummy! Tasted even better! :D
My High Altitude version of Martha's Banana Bread!
Bake at 350 for 60 minutes.
Stamps: Stampendous Changito
Paper: Basic Grey, Reminisce GOIN' BANANAS paper
Ink: Memento
Accessories: Copics, circle and leaf punches, glitter pen, and rhinestones
So, here's the 3rd batch of the high altitude version. Looks yummy! Tasted even better! :D
- 1/2c butter (1 stick) at room temp.
- 1c sugar minus 1T.
- 2 egg
- 1 3/4c flour
- 1/2t baking soda
- 1t salt
- 1c mashed bananas
- 1/2c sour cream
- 1t vanilla
- 1/2c chopped pecans (opt.)
Bake at 350 for 60 minutes.
Sunday, March 28, 2010
SC273 - Washi Tape Get Well
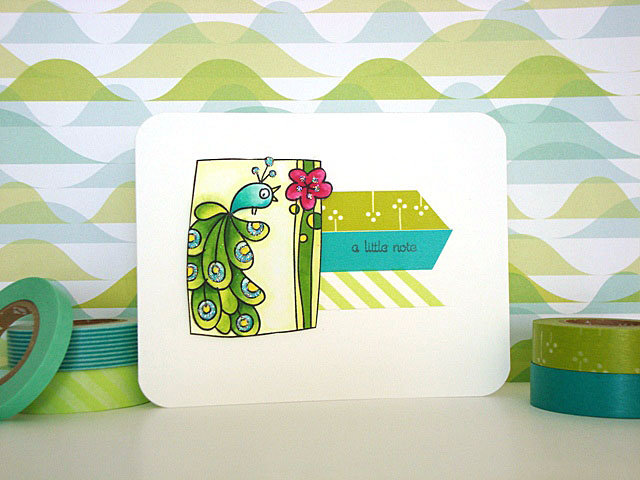
My friend, Heather, turned me on to Washi Tape - Japanese masking tape. It is the coolest stuff. It comes in all these incredible colors and patterns. It's a low tack tape so it's "repositionable". I had just ordered the "waterfall" collection from HAPPY TAPE and as Heather says, "was petting it". Yesterday, I was shopping at Archivers (avoiding going home to an empty, Jazz-free house) when I saw this Stampendous Peacock stamp and those bright aquas and limes in the Waterfall collection coalesced in my brain.
The peacock was colored with Copics and for additional sparkle I used some glitter (everything is better with glitter, right?) The little pop of raspberry in the flower really breaks up the blue/green/yellow monopoly.
Close up of the glitter areas. You can see I stamped the sentiment directly on the washi tape. Since it's not a porous tape I used Archival black and allowed it to dry overnight.
The weekly SCS Sketch Challenge (SC273) was perfect for the washi tape and peacock image!
Stamps: Stampendous ART PEACOCK; Elzybells sentiment
Paper: White cardstock
Ink: Archival Black, Momento
Accessories: washi tape, glitter, Copics (RV09, R81, Y02, Y13, Y0000, Y000, YG00, YG03, YG13, YG17, YG67, BG10, BG0000, BG13, BG15, BG34)
The weekly SCS Sketch Challenge (SC273) was perfect for the washi tape and peacock image!Stamps: Stampendous ART PEACOCK; Elzybells sentiment
Paper: White cardstock
Ink: Archival Black, Momento
Accessories: washi tape, glitter, Copics (RV09, R81, Y02, Y13, Y0000, Y000, YG00, YG03, YG13, YG17, YG67, BG10, BG0000, BG13, BG15, BG34)
Thursday, March 11, 2010
A Bunch of Challenges (and no Mojo...)
I haven't been stamping much this week. It's tax time. :( And NO...I'm not getting to far to fast with that one.) And my MOJO went on Spring Break without me (though I'm heading for Phoenix for a small mini-Spring Break in a few hours!)
For this card I had created a Glimmer Mist background of my favorite colors for Gingersnap Creations - 3 FAVORITE COLORS (GC43) challenge. I like *ALL* the colors so it was hard to pick just three - I ended up with pink, blue, green. The Glimmer Mist is just sprayed and layered until I got the mix I liked. Spiltcoast's sketch challenge (SC271) worked perfectly for the large image. BUT I think this is missing something...not 100% happy with it.
Stamps: Stampington & Co PARISIAN SHELL
Paper: Neenah Solar White, blue, green, pink cardstock
Ink: Archival Black
Accessories: Glimmer Mist
I had extra sections of the Glimmer Mist sheet, so I cut it into strips. The flower was lightly watercolored with Distress Ink and glittered. This is for another Gingersnap Creation - Happy Birthday (GC44) challenge!
Stamps: Stampendous RUFFLED FLOWER
Paper: Neenah Solar White and pink card stock
Ink: Memento, Distress Ink WORN LIPSTICK and SPUN SUGAR
Accessories: glitter
And my niece's new sister-in-law had surgery this week for a second cochlear implant. So I needed a quick get well card! This Penny Black dog wearing cat slippers was already colored. I just needed to finish a card. For inspiration, I used SCS sketch 223. Somebody sent me these Prima cork flowers. Not too impressed - they fall apart easily but it was a nice texture.
UPDATE: FETCHING SLIPPERS is out of print - sorry to tease you! :(
Stamps: Penny Black FETCHING SLIPPERS; Amuse sentiment
Paper: Basic Grey KIOSHI
Ink: black
Accessories: Prima cork flowers, Stickles and Copics
Stamps: Stampington & Co PARISIAN SHELL
Paper: Neenah Solar White, blue, green, pink cardstock
Ink: Archival Black
Accessories: Glimmer Mist
Stamps: Stampendous RUFFLED FLOWER
Paper: Neenah Solar White and pink card stock
Ink: Memento, Distress Ink WORN LIPSTICK and SPUN SUGAR
Accessories: glitter
UPDATE: FETCHING SLIPPERS is out of print - sorry to tease you! :(
Stamps: Penny Black FETCHING SLIPPERS; Amuse sentiment
Paper: Basic Grey KIOSHI
Ink: black
Accessories: Prima cork flowers, Stickles and Copics
Tuesday, December 1, 2009
Birthday Card Fairy - December
First - tell me honestly what you think of the blog holiday "decorations". Specifically the font colors. I can't tell if they work or not. On my work computer they look ok, but on my home computer they're a bit obnoxious. (sigh)
So, really quick here are the Birthday Fairy cards I'm sending out to the WISH RAK (random acts of kindness) for the December birthday girls. I used card kits again.
I did two of the Rubber Romance cards in the same layout.
Stamps: Rubber Romance
Paper: unknown
Ink: unknown
Accessories: Copics, glitter pen, prima flowers, ribbon
I used last week's SCS sketch challenge (SC256) for this layout.
Stamps: Stampendous Fluffles
Paper: unknown
Ink: unknown
Accessories: nesties
And with the extra image and paper I did this version. I used my Memory Maker's tag maker and a turquoise glitter frame.
Stamps: Stampendous Fluffles
Paper: unknown
Ink: unknown
Accessories: glitter tag frame, ribbon, Martha Stewart border punch
NOW...off to work on my first TIM HOLTZ tag....check back later today!
So, really quick here are the Birthday Fairy cards I'm sending out to the WISH RAK (random acts of kindness) for the December birthday girls. I used card kits again.
Stamps: Rubber Romance
Paper: unknown
Ink: unknown
Accessories: Copics, glitter pen, prima flowers, ribbon
Stamps: Stampendous Fluffles
Paper: unknown
Ink: unknown
Accessories: nesties
Stamps: Stampendous Fluffles
Paper: unknown
Ink: unknown
Accessories: glitter tag frame, ribbon, Martha Stewart border punch
NOW...off to work on my first TIM HOLTZ tag....check back later today!
Saturday, November 28, 2009
Watercolor (a tutorial of sorts)
So I ventured out to the stores today...I had to. My niece has a birthday in a few short days and I needed to get a gift. And I'm working on a "December Daily" album ala Ali Edwards. I needed a few more window sheets for that. It wasn't too bad. I think the worst of the "Black Friday" stuff is over. (wink) Now it's just the usual Christmas madness.
I'd like to share some pictures I took while making this card I posted a month or so ago for KLSNS Snowflake challenge tutorial. Over a year ago I took a watercoloring class at my LSS from Dave Brethauer of Memory Box Stamps. This is one of the basic background watercolor techniques.
Stamps: Stampendous SILENT NIGHT SNOWMAN
Paper: Basic Grey ESKIMO KISSES
Ink: SU! Bermuda Bay, Rich Razzelberry, and Melon Mambo (re-inkers)
Accessories: Deb's Crystal snowflakes, EK Success border punch, glitter pen, aqua pen, glue pen, glitter, and Souffle pen.
I use 140lbs cold-press watercolor paper. Mist a section of paper with water until shiny. Wait a few minutes until the paper absorbs some (not all) of the water.
In the LSS class, Dave had us use Twinkling H2Os for coloring. It's a great look with the shimmer of mica, but here I used SU! re-inkers. Water them down a bit. A little color goes a LONG way in watercolor.
Use a aqua pen or paint brush to drag a bit of color back and forth in a block. Start in one corner and don't lift the brush. The water on the paper will draw the color "down". Flip the paper 180-degrees and drag a second color into the center to meet the first color. I used a very little of the Razzelberry at the very top.
Then using pure color you can add a 1/2 drop in the corner. Let the water draw the ink down. If you need a bit more water, mist gently.
Dry the paper completely. If you leave it to dry naturally, the colors will mix very subtlety. But you can also use the heat gun to speed the process. The colors will stay a little more separate with the heat gun. When completely dry you can stamp directly over the watercolor in permanent ink. I always use Archival Ink for this because it will stay "on top" of the color.
Using solid colors, you can then highlight the image (lower left along the bottom & the hat/scarf - not visible in this picture). And a final highlight of Souffle pen and glitter - because well it's GLITTER! (GRIN).
I'd like to share some pictures I took while making this card I posted a month or so ago for KLSNS Snowflake challenge tutorial. Over a year ago I took a watercoloring class at my LSS from Dave Brethauer of Memory Box Stamps. This is one of the basic background watercolor techniques.
Paper: Basic Grey ESKIMO KISSES
Ink: SU! Bermuda Bay, Rich Razzelberry, and Melon Mambo (re-inkers)
Accessories: Deb's Crystal snowflakes, EK Success border punch, glitter pen, aqua pen, glue pen, glitter, and Souffle pen.
Friday, November 13, 2009
VSN #5 - BENVENUTI al CARNIVALE di VENEZIA!
HI! Welcome to my challenge! Please join me on the SCS VSN thread and play along!
My sister teaches high school math/science at Aviano High School, Aviano Air Force Base, Italy which is an hour north of Venice, Italy. We visit from time to time and in 2001, we went to Carnivale (the Italian version of Mardi Gras). Unlike it’s New Orleans counter part, this is more Masquerade Ball than Street Party. The denizens of Venice spend up to a year on costumes to be displayed in San Marco Square during the festivities. These elegant costumes are head to toe FABULOUS! I took over 20 pictures of costumes and narrowing it down to 4 to share was nearly impossible.
My challenge is for you: Using one of the costume patterns listed below create your own card. Remember, the Venice Carnival is all about opulence! Check the challenge thread for the specific requirements related to each picture!
THE GHOST
The challenge picture.
My version of the challenge.
Stamps: Magnolia EDWIN'S SNOWMAN
Paper: acetate, metallic aqua,
Ink: Memento Tuxedo Black
Accessories: rub-ons, ribbon (unraveled grosgrain), COPICS, paper snowflakes, rhinestones
THE LADY IN RED
The challenge picture.
My version of the challenge.
Stamps: Stampin Up! FRIENDS 24-7
Paper: white, SU! Real Red, Summer Sun
Ink: SU! Real Red, Summer Sun
Accessories: Heidi Swapp Mask, Glimmer Mist: Candy Apple Red, Sunflower, Nestabilities tag & ovals, embossing folders, paper piercer, and rhinestones.
BAROQUE COUPLE
The challenge picture.
My version of the challenge.
Stamps: Magnolia NEW YEARS TILDA, Stampin Up! WONDERFUL WORDS
Paper: black, white, cream, metallic gold
Ink: Memento Tuxedo Black
Accessories: Nestablities Lacy Border, EK Success border punch, gold glimmer pen, polka dot ribbon, gold fringe cord, rhinestones, Copics, and Glossy Accents (on her shoes).
THE SUNFLOWER
The challenge picture.
My version of the challenge
Stamps: Stampin Up! SUNFLOWERS, Stampendous GRASSHOPPER, PaperTrey Ink MIXED MESSAGES
Paper: Cream and white mulberry paper
Ink: Brilliance Black
Accessories: Clear EP, Glimmer Mist: Patina, Sunflower, Key Lime Pie, Prima flower (sprayed with Sunflower), button, Scrapper's Floss, Sizzix ARCHITECTURAL ACCENTS and tag, green glimmer pen.
Hope you play along!
My sister teaches high school math/science at Aviano High School, Aviano Air Force Base, Italy which is an hour north of Venice, Italy. We visit from time to time and in 2001, we went to Carnivale (the Italian version of Mardi Gras). Unlike it’s New Orleans counter part, this is more Masquerade Ball than Street Party. The denizens of Venice spend up to a year on costumes to be displayed in San Marco Square during the festivities. These elegant costumes are head to toe FABULOUS! I took over 20 pictures of costumes and narrowing it down to 4 to share was nearly impossible.
My challenge is for you: Using one of the costume patterns listed below create your own card. Remember, the Venice Carnival is all about opulence! Check the challenge thread for the specific requirements related to each picture!
THE GHOST
Stamps: Magnolia EDWIN'S SNOWMAN
Paper: acetate, metallic aqua,
Ink: Memento Tuxedo Black
Accessories: rub-ons, ribbon (unraveled grosgrain), COPICS, paper snowflakes, rhinestones
THE LADY IN RED
Stamps: Stampin Up! FRIENDS 24-7
Paper: white, SU! Real Red, Summer Sun
Ink: SU! Real Red, Summer Sun
Accessories: Heidi Swapp Mask, Glimmer Mist: Candy Apple Red, Sunflower, Nestabilities tag & ovals, embossing folders, paper piercer, and rhinestones.
BAROQUE COUPLE
Stamps: Magnolia NEW YEARS TILDA, Stampin Up! WONDERFUL WORDS
Paper: black, white, cream, metallic gold
Ink: Memento Tuxedo Black
Accessories: Nestablities Lacy Border, EK Success border punch, gold glimmer pen, polka dot ribbon, gold fringe cord, rhinestones, Copics, and Glossy Accents (on her shoes).
THE SUNFLOWER
Stamps: Stampin Up! SUNFLOWERS, Stampendous GRASSHOPPER, PaperTrey Ink MIXED MESSAGES
Paper: Cream and white mulberry paper
Ink: Brilliance Black
Accessories: Clear EP, Glimmer Mist: Patina, Sunflower, Key Lime Pie, Prima flower (sprayed with Sunflower), button, Scrapper's Floss, Sizzix ARCHITECTURAL ACCENTS and tag, green glimmer pen.
Hope you play along!
Thursday, October 15, 2009
King Kandy Korn
I LOVE CANDY CORN!
So, when I saw this little spider standing on his pile of candy corn - I *TOTALLY* understood him!

Stamps: Art Gone Wild CANDY CORN STACK; Stampendous COSTUME KIDS
Paper: K & Company
Ink: Memento Tuxedo Black
Accessories: Copics, Martha Stewart spider web punch, glitter pens, nail head rhinestone, and rhinestone words.
Friday, October 2, 2009
Halloween Treat - Surprise Inside!!
When I giggle over a project, I know it's cute! This one makes me giggle.
I read a variety of blogs and this one caught my eye last week - STAMPING INSPIRATION. The little coffin treat bags were so cute I needed to give it a try. I followed Marie's general cutting and folding directions for the basic card. On the front of mine card I used Technique Junkies' CREATEX CREATIONS technique to give me a swirly paper.
The surprise is inside where the little vampire FLUFFLE floats towards you when you open the card. I used a thin strip of acetate to make him hover over the coffin. Instead of using Velcro dots to keep the coffin closed, I used Basic Grey magnets. The little ribbon pieces just help pull open the card.
Stamps: Stampendous Vampire Fluffle, Amuse Sentiment
Paper: SU! Basic Black, glossy black card stock, acetate
Ink: SU! Pumpkin Pie and Elegant Eggplant
Accessories: SU! markers, Createx airbrush paint, Basic Grey magnets, ribbon, and scollap punches.
Technique Junkies: Createx Creation
Stamps: Stampendous Vampire Fluffle, Amuse Sentiment
Paper: SU! Basic Black, glossy black card stock, acetate
Ink: SU! Pumpkin Pie and Elegant Eggplant
Accessories: SU! markers, Createx airbrush paint, Basic Grey magnets, ribbon, and scollap punches.
Technique Junkies: Createx Creation
Wednesday, September 23, 2009
Random Acts of Kindness
I'm in a group on SCS, where you can post "wishes" for images or products. Which keeps me from buying EVERY stamp I see. (grin) Somebody else in the group will fulfill my wish, if they have the stamp. I earn wishes by filling other member wishes - RANDOM ACTS OF KINDNESS (Wish RAK). Every month one of the group leaders posts 3 challenges. The only rule is that you must use one of your Wish RAK gifts. These are my entries for the month.
This challenge was to use 1/4 cup of rice in a plastic bag or balloon as a "stamp" to make a background. I tried to follow the directions (really I did) but it was just a big mess. So I improvised. I used embossing ink and clear EP with the rice stamp. After it was heated and set - I sprayed Glimmer Mist on the paper to make this INCREDIBLE background. The picture does *NOT* do it justice. The white dandelion on black was my wish RAK. To finish I put the round Denami HAPPY BIRTHDAY sentiment and a few rhinestones.
Stamps: dandelion (Penny Black?); sentiment Denami Designs
Paper: Neenah Solar White (aka PTI white), black, olive green, and aqua cardstock.
Ink: White, SU! Bermuda Bay and Kiwi Kiss
Accessories: Glimmer Mist: Patina, Olive Green, Sapphire; rhinestones, clear EP, and round punches.
The hostess was inspired by the apple harvest in Michigan to create this color challenge: SU! Real Red, Barley Banana, and Certainly Celery (or Old Olive). I was inspired to use apples too! This EDWIN stamp was the Wish RAK (I think he looks like my nephew in his glasses). I colored Edwin with Copics. His sweater was colored and then using a wash cloth and blending solution I dabbed the sweater to give it texture. It really does look "fuzzy". I used this week's SCS Sketch Callenge #247. The apple core is punch art inspired by Julia Bettencourt. Red and cream cardstock is punched with SU! Rounded Tab punch. The cream is brushed with Creamy Caramel. The red is cut with decorative scissors. The seeds are Denami Raindrops. The sentiment is in a great set from Stampendous called LITTLE FRUIT. Die cut with my Nestabilities Labels and sponges with Summer Sun.
Stamps: Magnolia EDWIN, Stampendous LITTLE FRUIT, Denmani RAIN DROPS
Paper: SU! Real Red, Old Olive, and Barely Banana; SU! designer
Ink: SU! Summer Sun, Real Red, Creamy Caramel
Accessories: EK Success border punch, SU! Rounded tab punch, Fiskar scissors, Crystal Effects, Nestabilities, twine, and Copics.
The final challenge was a sketch. I just got the new Basic Grey's EERIE paper and I had to use it! The dotted paper and strip were busy enough not to need additional enhancement. The mummy (Wish RAK) was colored with SU! markers. And then I used my SU! color spritzer to give him a confetti background.
Stamps: Stampendous CHANGITO
Paper: Basic Grey EERIE
Ink: none
Accessories: Martha Stewart web border & corner punch, Making Memories label, SU! Markers, SU! color spritzer, and rhinestones.
Stamps: dandelion (Penny Black?); sentiment Denami Designs
Paper: Neenah Solar White (aka PTI white), black, olive green, and aqua cardstock.
Ink: White, SU! Bermuda Bay and Kiwi Kiss
Accessories: Glimmer Mist: Patina, Olive Green, Sapphire; rhinestones, clear EP, and round punches.
Stamps: Magnolia EDWIN, Stampendous LITTLE FRUIT, Denmani RAIN DROPS
Paper: SU! Real Red, Old Olive, and Barely Banana; SU! designer
Ink: SU! Summer Sun, Real Red, Creamy Caramel
Accessories: EK Success border punch, SU! Rounded tab punch, Fiskar scissors, Crystal Effects, Nestabilities, twine, and Copics.
Stamps: Stampendous CHANGITO
Paper: Basic Grey EERIE
Ink: none
Accessories: Martha Stewart web border & corner punch, Making Memories label, SU! Markers, SU! color spritzer, and rhinestones.
Subscribe to:
Posts (Atom)