 Memory Box has a great line of butterfly stamps (and paper). I colored this butterfly with twinkling H2O's.

Showing posts with label Twinkling H2O. Show all posts
Showing posts with label Twinkling H2O. Show all posts
Saturday, March 3, 2012
Sympathy Cards
It's a sad fact of life that now and then you need a sympathy card. I always like to use a butterfly, to sympbolize transformation and rebirth.
 Memory Box has a great line of butterfly stamps (and paper). I colored this butterfly with twinkling H2O's.
Memory Box has a great line of butterfly stamps (and paper). I colored this butterfly with twinkling H2O's.

Wednesday, April 20, 2011
GC99: Fans
Continuing with the Asian inspiration over on Gingersnap Creations - today's challenge is FANS!
 I took this more figuratively then literally. I opted to make a fan-fold medallion to highlight my koi.
 When I make a background with a spray and/or ink method, I will use a clean tag to "clean-up" any extra color on the mat. I did this background tag last week when I did the "mist" background.
 I did a simple fan-fold medallion. This is two pieces of 12 x 1.5 - scored every 1/4 inch.
 It's been a LONG time since I colored anything with Copics but I did do the gold fish.
Stamps: Great Impressions KOI, Memory Box DOT CIRCLE
Paper: tag, orange scrap
Ink: Memento
Accessories: Glimmer Mist, Twinkling H2O's, left ribbon, pearls, yarn
 I took this more figuratively then literally. I opted to make a fan-fold medallion to highlight my koi.
 When I make a background with a spray and/or ink method, I will use a clean tag to "clean-up" any extra color on the mat. I did this background tag last week when I did the "mist" background.
 I did a simple fan-fold medallion. This is two pieces of 12 x 1.5 - scored every 1/4 inch.
 It's been a LONG time since I colored anything with Copics but I did do the gold fish.
Stamps: Great Impressions KOI, Memory Box DOT CIRCLE
Paper: tag, orange scrap
Ink: Memento
Accessories: Glimmer Mist, Twinkling H2O's, left ribbon, pearls, yarn
Wednesday, April 13, 2011
GC98: Mists
It's Wednesday! That means another Gingersnap Creations post!! Today we're playing with Mists!
I have a VERY GOOD local stamp/scrap store. Kathy is great at bringing in traveling teachers. Several months ago, Fred B Mullett came to teach some messy but FUN classes. I took THE ELEGANT MESS. This is just one of the techniques we did that night to make incredible, 0ne-of-a-kind backgrounds!
 One of the papers we used was Oriental Calligraphy paper. The best way to describe this is really stiff tissue paper. It's very thin but will hold up to lots of water. You can find it here on Fred's web page.
 We used Adirondack Colorwash in a variety of strengths, but any color wash/mist will work. I used Glimmer Mist for this card. I chose 4 colors (Key Lime Pie, Sunflower, Turquoise Blue, and Tiger Lily) and started with the lightest and randomly sprayed on part of the paper.
 Then I used several kitchen items as masks (penny sink mat, sushi mat, rubber shelf liner). Spraying other colors over the masks, flipping them over onto other sections, and making an "elegant mess".
 Then I let it dry for a bit. You can use a heat gun to speed things up - I did to finish the drying.
 24 hours before I started, I choose three Twinkling H2Os (Dreamsicle, Summer Breeze, Apple Blossom). I filled each pot up with water and let it sit. The water made the H2O's very "gloopy"...kinda like Elmers Glue.
By scooping a little color out onto my mat and adding a bit more water, I could stamp with it (Apple Blossom and Memory Box Sonoma Print). Or fill my brush and fling it. The final result is a large piece of background that can be used for multiple card!
 In Fred's class he had little window template so you could figure out where in your sheet you wanted to cut. He has one on his web page - CROPPING TOOL TEMPLATE. There's also a short video. Note the PDF template does not have the marking holes.
 He also has a template for the card base - the rectangle works perfectly with the template. As you can see this card would be perfect without any further embellishments. I choose to stamp the Stampin' Up geisha over the color block. Even my "sits on top of everything" Archival black wasn't 100% crisp.
The final touch was a double coin knot. I used a thick paper cord in a turquoise blue.
Stamps: Stampin' Up! DREAM GARDENS, Memory Box SONOMA PRINT
Paper: Oriental Calligraphy paper, Neenah Solar White
Ink: Archival Black
Accessories: Glimmer Mist, Twinkling H2O's, found masking items, Japanese cord
Please join us in using MISTS at Gingersnap Creations! You have a month to make your entry.
I have a VERY GOOD local stamp/scrap store. Kathy is great at bringing in traveling teachers. Several months ago, Fred B Mullett came to teach some messy but FUN classes. I took THE ELEGANT MESS. This is just one of the techniques we did that night to make incredible, 0ne-of-a-kind backgrounds!
 One of the papers we used was Oriental Calligraphy paper. The best way to describe this is really stiff tissue paper. It's very thin but will hold up to lots of water. You can find it here on Fred's web page.
 We used Adirondack Colorwash in a variety of strengths, but any color wash/mist will work. I used Glimmer Mist for this card. I chose 4 colors (Key Lime Pie, Sunflower, Turquoise Blue, and Tiger Lily) and started with the lightest and randomly sprayed on part of the paper.
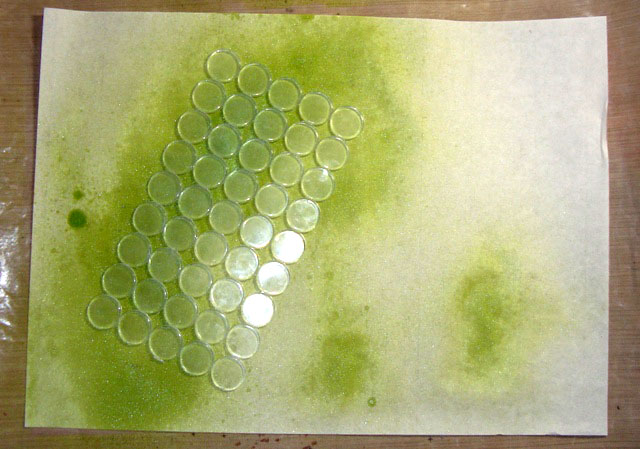 Then I used several kitchen items as masks (penny sink mat, sushi mat, rubber shelf liner). Spraying other colors over the masks, flipping them over onto other sections, and making an "elegant mess".
 Then I let it dry for a bit. You can use a heat gun to speed things up - I did to finish the drying.
 24 hours before I started, I choose three Twinkling H2Os (Dreamsicle, Summer Breeze, Apple Blossom). I filled each pot up with water and let it sit. The water made the H2O's very "gloopy"...kinda like Elmers Glue.
By scooping a little color out onto my mat and adding a bit more water, I could stamp with it (Apple Blossom and Memory Box Sonoma Print). Or fill my brush and fling it. The final result is a large piece of background that can be used for multiple card!
 In Fred's class he had little window template so you could figure out where in your sheet you wanted to cut. He has one on his web page - CROPPING TOOL TEMPLATE. There's also a short video. Note the PDF template does not have the marking holes.
 He also has a template for the card base - the rectangle works perfectly with the template. As you can see this card would be perfect without any further embellishments. I choose to stamp the Stampin' Up geisha over the color block. Even my "sits on top of everything" Archival black wasn't 100% crisp.
The final touch was a double coin knot. I used a thick paper cord in a turquoise blue.
Stamps: Stampin' Up! DREAM GARDENS, Memory Box SONOMA PRINT
Paper: Oriental Calligraphy paper, Neenah Solar White
Ink: Archival Black
Accessories: Glimmer Mist, Twinkling H2O's, found masking items, Japanese cord
Please join us in using MISTS at Gingersnap Creations! You have a month to make your entry.
Thursday, October 14, 2010
A *BELATED* Happy Birthday to GRANT!!
I have one niece and one nephew...my sister's kids.
I have two nieces and one nephew of the heart...my best girlfriends' kids.
My adopted nephew, Grant, turned 18 last month. And the "scummy" Aunt Deb that I am...I didn't get a card in the mail to him. And then I didn't get a card in the mail to him. AND I STILL DIDN'T GET A CARD IN THE MAIL TO HIM! (UGH!)
Excuses? I have many but I think you'll all understand when I say...making a card for a man is HARD!
Then inspiration hit...my Fred B Mullet fish stamps! They needed ink. Or in this case - BLEACH!
 I started with two blue papers from Stampin Up (Not Quite Navy and Night of Navy. I wasn't sure how the bleach would react with the paper. This is the Night of Navy and you can see that it bleached out to a "tan" color. (The Not Quite Navy turned a pink color - yuck!) After that dried I stamped with the same color SU! ink over the bleached fish.
Finally, I added a bunch of water to a pot of Twinkling H2O's and let it set. As the water absorbs the H2O becomes "gloppy". With a paint brush I put some on my mat and added a bit more water and then "inked" up the stamp! And I got the cool metallic looking fish!
The fish on white paper is the same H2O. After it dried I used my stamp positioner to restamp with Archival.
I think it turned out cool!
Happy Belated Birthday Grant!! (love you!)
Stamps: Fred B Mullet, Amuse sentiment
Paper: Stampin Up! Night of Navy, Whisper White
Ink: bleach, Night of Navy, Archival black
Accessories: fly, Twinkling H2O's
I have two nieces and one nephew of the heart...my best girlfriends' kids.
My adopted nephew, Grant, turned 18 last month. And the "scummy" Aunt Deb that I am...I didn't get a card in the mail to him. And then I didn't get a card in the mail to him. AND I STILL DIDN'T GET A CARD IN THE MAIL TO HIM! (UGH!)
Excuses? I have many but I think you'll all understand when I say...making a card for a man is HARD!
Then inspiration hit...my Fred B Mullet fish stamps! They needed ink. Or in this case - BLEACH!
 I started with two blue papers from Stampin Up (Not Quite Navy and Night of Navy. I wasn't sure how the bleach would react with the paper. This is the Night of Navy and you can see that it bleached out to a "tan" color. (The Not Quite Navy turned a pink color - yuck!) After that dried I stamped with the same color SU! ink over the bleached fish.
 Finally, I added a bunch of water to a pot of Twinkling H2O's and let it set. As the water absorbs the H2O becomes "gloppy". With a paint brush I put some on my mat and added a bit more water and then "inked" up the stamp! And I got the cool metallic looking fish!
The fish on white paper is the same H2O. After it dried I used my stamp positioner to restamp with Archival.
I think it turned out cool!
Happy Belated Birthday Grant!! (love you!)
Stamps: Fred B Mullet, Amuse sentiment
Paper: Stampin Up! Night of Navy, Whisper White
Ink: bleach, Night of Navy, Archival black
Accessories: fly, Twinkling H2O's
Monday, August 16, 2010
With Deepest Sympathy
A friend lost her father this last week. I don't keep sympathy cards on hand. Many months ago I had seen this tutorial by Jennifer McGuire, and this is pretty much a CASE from the stand point of the coloring and card shape. But I did do somethings differently.
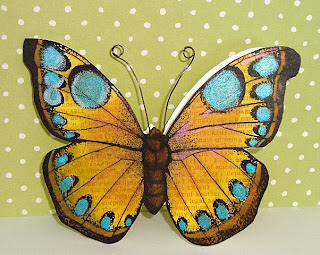 I had never used a digi print before. Jennifer's video goes into great detail about how to buy, download, and use the digi print, so I won't cover it.
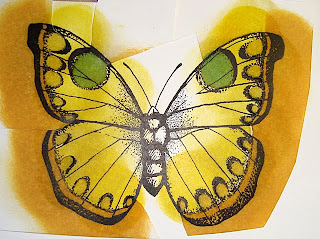 I started by cutting out a mask of the areas I wanted to keep the color from. Then I sponged Mustard Seed along the outer wing edges.
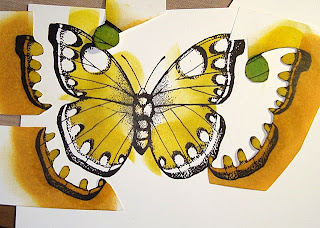 After removing the masks you can see that the wing tips and spots are still white.
 Then I sponged Wild Honey in the center and used Jennifer's method for the wing tips (flat piece of scrap paper as a mask).
 Then I used the other part of the mask that had the spots cut out and sponged blue from the center out; being very careful not to cross the line (you can still see a bit of white).
 The larger spots I sponged directly with a twisting motion.
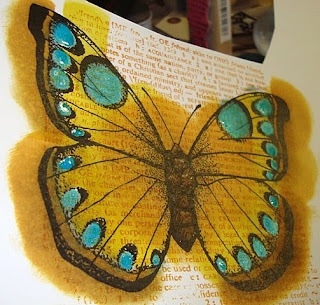 Then like Jennifer, I stamped the "FRIENDS DEFINITION" over the entire area. I selected a Twinkling H2O that matched the Broken China blue and painted circles around the edges. You can see it's still wet in the upper left.
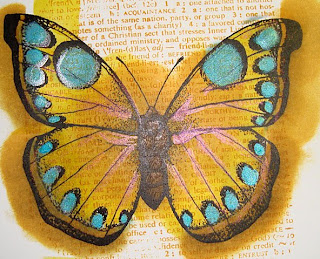 And a coppery color along the wing veins. Once dry you get a glimmer. The body was colored a darker brown with a Copic marker. Then I cut out two single butterfly shapes and adhered them together. One I wanted to cover any color that might have gotten on the back of the colored butterfly. And two, I wanted the butterfly shape to have a little more strength. Stampin Up! Whisper White is a great card stock for sponging (there's no tooth to it so the color flows), but it's not very sturdy.
 I cut more card stock 4.25" x 11" and scored it, like a normal card. I off set the colored butterfly just a bit, so there would be a fold along the wing edge.
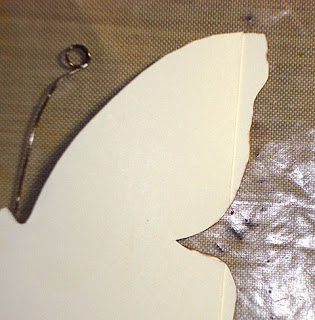 I made antennae out of wire and placed it between the colored butterfly and the card.
Stamps: Hero Arts digi-print & FRIENDS DEFINITION
Paper: Stampin Up! Whisper White
Ink: Distress Ink
Accessories: wire, Twinkling H2O's
 I had never used a digi print before. Jennifer's video goes into great detail about how to buy, download, and use the digi print, so I won't cover it.
 I started by cutting out a mask of the areas I wanted to keep the color from. Then I sponged Mustard Seed along the outer wing edges.
 After removing the masks you can see that the wing tips and spots are still white.
 Then I sponged Wild Honey in the center and used Jennifer's method for the wing tips (flat piece of scrap paper as a mask).
 Then I used the other part of the mask that had the spots cut out and sponged blue from the center out; being very careful not to cross the line (you can still see a bit of white).
 The larger spots I sponged directly with a twisting motion.
 Then like Jennifer, I stamped the "FRIENDS DEFINITION" over the entire area. I selected a Twinkling H2O that matched the Broken China blue and painted circles around the edges. You can see it's still wet in the upper left.
 And a coppery color along the wing veins. Once dry you get a glimmer. The body was colored a darker brown with a Copic marker. Then I cut out two single butterfly shapes and adhered them together. One I wanted to cover any color that might have gotten on the back of the colored butterfly. And two, I wanted the butterfly shape to have a little more strength. Stampin Up! Whisper White is a great card stock for sponging (there's no tooth to it so the color flows), but it's not very sturdy.
 I cut more card stock 4.25" x 11" and scored it, like a normal card. I off set the colored butterfly just a bit, so there would be a fold along the wing edge.
 I made antennae out of wire and placed it between the colored butterfly and the card.
Stamps: Hero Arts digi-print & FRIENDS DEFINITION
Paper: Stampin Up! Whisper White
Ink: Distress Ink
Accessories: wire, Twinkling H2O's
Saturday, August 14, 2010
The Elegant Mess - Fred B Mullett class
The best thing about having an independent local stamp/scrapbook store (LSS) are the traveling teachers that come! My LSS hosted Fred B Mullet this weekend. I had signed up for his "THE ELEGANT MESS" class before I was laid off. What a TREAT this class was!
Using Ranger Adirondack Color Wash sprays, masks, and Twinkling H2O's we made background papers.
Unlike Glimmer Mist, the Color Wash sprays are straight color with no mica powder. Fred had watered some of them down for lighter shades. The H2O's add the "glimmer" - both through splattering and stamping with H2O's (you wet them down until they are mostly goop).
 Here's the first background made on a thin Japanese paper. It's like tissue paper but a bit thicker.
 Here's the card from that background.
 This is the other Japanese paper background. The H2O's I was using were not "flinging" in a droplet manner but in big blotches. I thought I had "ruined" the paper but as you can see below, it turned out ok!
 I think this is my favorite - but in the class it's like trying to pick between your favorite kids. I love them all equally! Then we turned to another paper...
 ... to 90 lbs. watercolor paper. This time the paper wasn't saturated with color and is more subtle. We also didn't use the H2O's.
 The class handouts included a set of "masks" to cut out for a positive/negative image. These "masks" are available on Fred's website in PDF format. I picked the petroglyph horse. The background of this card is the paper above. The horse was cut from the right half of the piece below.
 The 2nd sheet of 90 lbs. watercolor paper.
 I also used the negative image of the petroglyph horse and a piece of the Japanese paper to back the image.
 Both watercolor papers also had backs - the "wiped up" mist left from the other side of the paper. I do this often with glimmer mist - it makes the best backgrounds!
 I still have LOTS and LOTS of paper left. I can't wait to continue playing with the left over scraps (and make some more)!!!
Using Ranger Adirondack Color Wash sprays, masks, and Twinkling H2O's we made background papers.
Unlike Glimmer Mist, the Color Wash sprays are straight color with no mica powder. Fred had watered some of them down for lighter shades. The H2O's add the "glimmer" - both through splattering and stamping with H2O's (you wet them down until they are mostly goop).
 Here's the first background made on a thin Japanese paper. It's like tissue paper but a bit thicker.
 Here's the card from that background.
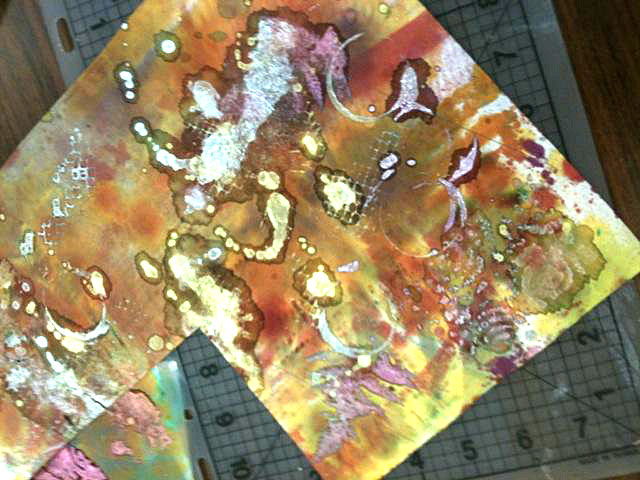 This is the other Japanese paper background. The H2O's I was using were not "flinging" in a droplet manner but in big blotches. I thought I had "ruined" the paper but as you can see below, it turned out ok!
 I think this is my favorite - but in the class it's like trying to pick between your favorite kids. I love them all equally! Then we turned to another paper...
 ... to 90 lbs. watercolor paper. This time the paper wasn't saturated with color and is more subtle. We also didn't use the H2O's.
 The class handouts included a set of "masks" to cut out for a positive/negative image. These "masks" are available on Fred's website in PDF format. I picked the petroglyph horse. The background of this card is the paper above. The horse was cut from the right half of the piece below.
 The 2nd sheet of 90 lbs. watercolor paper.
 I also used the negative image of the petroglyph horse and a piece of the Japanese paper to back the image.
 Both watercolor papers also had backs - the "wiped up" mist left from the other side of the paper. I do this often with glimmer mist - it makes the best backgrounds!
 I still have LOTS and LOTS of paper left. I can't wait to continue playing with the left over scraps (and make some more)!!!
Subscribe to:
Posts (Atom)