Showing posts with label mini album. Show all posts

Saturday, October 15, 2011

Poe Mini Album

I love October! The leaves are changing. The countdown to Halloween is ticking away. And the CANDY CORN IS OUT!! (yes, I'm addicted to candy corn).

In celebration of All Things POE this month at Gingersnap Creations, I wanted to share this quick little mini album I created for my Poe.

Here's the finished album. It's 4x4 and about inch thick. AND! It can hold as many pictures as you want to add.

The supply list is pretty basic. 2 coasters (4x4), 18" ribbon, 2 pieces of double sided card stock cut 4x12, 4x4 piece of coordinating paper, 12x12 card stock for the accordion pages, and Red Line tape.

Start by covering both sides of each coaster with tape. Trim off excess tape.

Cut the ribbon in half. Remove the protective tape covers from one side and stick the ribbon in the middle of the coaster.

Lay each piece face down, ribbon out on one of the 4x12 papers. Place a piece of Red Line tape in the spine. Trim the extra paper off the corners. Remove all the protective tape covers.

Then slowly (because once it's down...it's down!) lay the other 4x12 paper on the inside. Trim the excess paper.

Cut a coordinating 4x4 paper for the outside of the spine. Lay it in the middle of the outside of the album. Gently pull both sides together and tie them. This will make the spine curve.

Cut your 12x12 piece of card stock 3 3/4" x 12". You'll get 3 pages. You can cut as many papers as you need. You may want to glue half to each album cover.

Score each strip every 3 3/4". I flipped my pages over after each score to help me pleat the papers. You will end up with a small tab at the end. Run tape down the tab, press to the next strip. On the last strip, cut the tab off. Pleat the papers.

Apply tape to one side of the stack.

Press into the album.

I liked the pleated paper to pull in the opposite direction.

Fill with photos of your favorite spook! I used some spooky pictures from my Hipstamatic iPhone app!

So where is Poe, you ask? Well, if you've read my Gingersnap bio...you know I adopted a rescue cat last Halloween. I named her Edgar ELLEN Poe...or Poe for short. (I love that her initials are E.E.P.!!)

Enjoy!!

Sunday, March 20, 2011

My 50th Birthday Travel Album

I finally finished it!! Last September my mom and I took a "family heritage" trip to the Madison Wisconsin area. On and off over the last 15 years, I've spent a great deal of time doing family genealogy research. My mom's family is "easy" because they all came from Norway between 1840 and 1850 - and settled in two counties (Dane and Green) Wisconsin. Thru Ancestry.com I've meet cousins 5 and 6 generations removed. Some still live very near the original homestead of the ancestors I've researched the most.

My greatest 50th birthday wish was to have my picture take at the grave of our common "mother", Birgit Halverson. She died on my birthday (83 years earlier). Despite 6-8 months of research, contacting EVERYBODY I could think of, sending my newly met cousins out to area cemeteries - we still haven't found Birgit's grave. But in the end I cherish meeting those cousins and sharing a common background! In addition, I wanted to visit the Wisconsin State Historical Society to gather records I could find online, but cost $15 a copy to get.

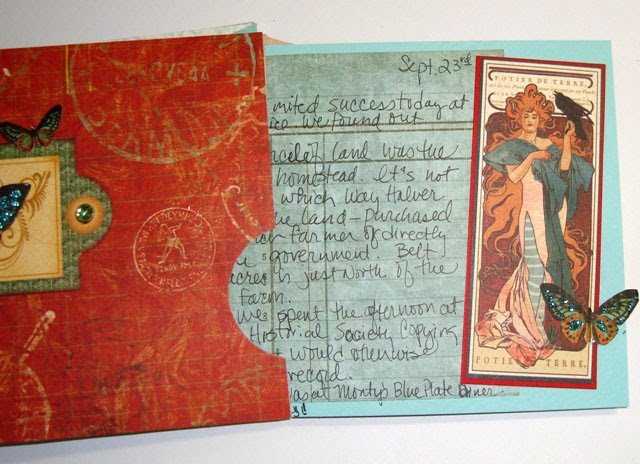
So here is my travel/birthday album from that trip. I started with a Graphic 45 Kraft envelope album. Covered a great deal of it in Graphic 45 Steampunk Debutant paper and added some additional mini envelopes for additional storage. Other supplies used: Primas, Glimmer Mist, rhinestones, Slice, washi tape, Memory Box stamps, and some Tim Holtz stuff.

Closed it's a pretty small album.
Just under flap is a picture (a bad one) of the birthday girl - ME!

Each "page" is an envelope. Inside I put a journal card and a photo for that day.
The small envelopes also have journal cards and hold "ephemera". In this case my pass to the UW library.


On my birthday I used this numbered paper and "highlighted" my age!


I decorated some of the inside flaps.


Wednesday, January 19, 2011

Gingersnap Creations: TEA BAG TEMPLATE


I wanted to do something a bit different with the tea bag template. AND I wanted to make a Valentine gift for my mom. The original template is posted here. I bumped up the size of the tea bag template just a bit and made a mini album with some pictures I took at Christmas. The mini album is titled GG's BB (Great Grandma's Brag Book).

Stamps: Stampin Up! NOTABLY ORNATE
Paper: River Rock
Ink: River Rock, Archival Coffee
Accessories: glitter letters, Prima rose, Basic Grey magnet, Scrapper's Floss


I increased the size of the template just a enough to hold 4x4 pictures. The width is 4.5" (not 3.5" ) and the length is 12" (scored at 5", 5.5", 6", and 11").

I used magnets on the inside flaps.

I cut 3 sets of pages 4" x 9.5" and scored in the middle. This gave me 6 pages for pictures. I used my paper piercer to make holes in the center at 3/4", 2", and 3 1/4". I placed the pages inside the tea bag and punched again.

I used scrapper's floss as binding thread. It's a simple figure eight. The ends of the floss come from the inside to the outside - end and center holes. The thread from the center goes into the other side and out through the middle again.

Then the threads are pulled tight.

And a knot is tied near the outside center. There's a photo section in each tea bag valley.

I picked some of my favorite pictures from our Christmas trip to meet Julian and used Photoshop to make them sepia toned. I printed 4" x 6" but trimmed them down to 4" x 4".

I left pages blank for future additions...

..and included a picture of all the family members. (Here's my nephew, Adam, who finally out grew Grandma).

If you'd like to play along with the Gingers, you have a MONTH to post your interpretation of the TEA BAG TEMPLATE on the Gingersnap Creation's post. Be sure to stop by here and leave me a link to your creation too!

See you next week!

Tuesday, November 30, 2010

December Daily 2009

I'm really not much of a scrapbooker. That comes mostly from having no kids. I feel narcissistic if I did just ME-ME-ME! I do scrapbook my trips. To branch out a bit I decided last year to do a December Daily album. If you're a fan of Ali Edwards, you know what I'm talking about. You make the album ahead of time and take one picture a day and journal what you were doing. That should be hard for a month right? RIGHT???

I had most of my pages done. I even got the pictures taken each day. But then came printing them out and journaling....not so much. :(

Last month I invited my local stamping buddies to join me at Archiver's for a weekend crop. My goal was to COMPLETE my December Daily before the next December arrived.

I post this on November 30th....as proof that I completed my 2009 December Daily!

Tuesday, January 19, 2010

Glimmer Mist Class

Well, my mojo is back!!! Helped in part by an ATC swap that's due on Friday (still trying to get it out the door but I have a plan!) And a class last night at Archivers'.

I generally take classes in hopes of 1) picking up a trick or two; 2) trying a new product; or 3) just because I like the project. In this case it was #1 & #3 - I'm always hoping to pick-up some new tip. I can't say I did in this class - beyond using a mask - these pages are simply sprayed. But I do like the project. I've never been one to follow crafting directions. I didn't in this case either. I moved pages around, applied my own "techniques", etc. Autumn, the teacher, is always great about letting me do my thing! (grin)

Not the best pictures of the project. It's so hard to show the glimmer and depth of color. This project used the Glimmer Mist embossed chipboard pages. Last night when I was misting the album, the liquid saturated into the chipboard and gave it a mottled look which I did not like. I was hoping that as the chipboard dried it would give up that look, and it did. I'm much more pleased today with the results. The embossed parts were rubbed with Distressed Ink.

I plan to print the pictures in a sepia tone. I think it will be a great mini album.

And I got some new Martha punches this weekend - 30% off at Michael's. I can't wait to use the bird punch...I think it will be a favorite!! Stay tuned for V-day projects using them!