So sad!
This is the last post I will do for Gingersnap Creations. It's been a very fun year!!
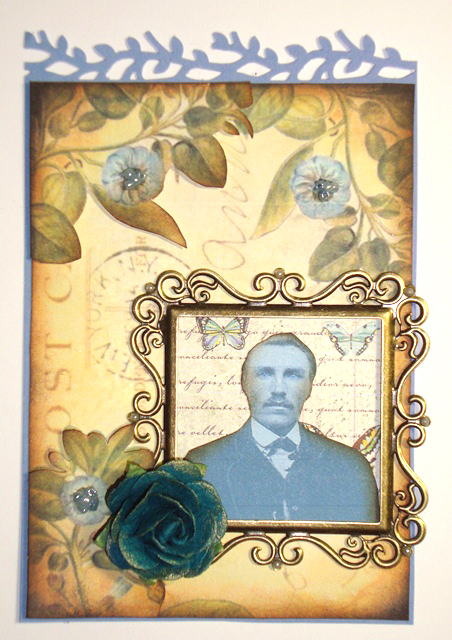
This last challenge is the annual color challenge - GC144: Copper, Rust, and Ginger. I know it looks yellow here but I used Wild Honey as the main color!
I did a 6x6 card using Retro Art Cafe's wonder digital collage sheets. #037 Oh Baby 2 and #DP188 Vintage Botanical Images.
I did a lot of layering on this piece.
Stop by Gingersnap Creations and look at all the beautiful art created by the talented design team!
Showing posts with label GCDT. Show all posts
Wednesday, March 28, 2012
Saturday, March 17, 2012
Gingersnap Creations: Altered Cabinet Cards
Oh, I don’t know where to start!
First, this is my last tutorial for Gingersnap Creations…I’ve had such a great time this last year sharing some of my creative journey with you. Thank you Shar & Ali for your leadership!
Second, I was so excited to see this month’s HERITAGE theme. For the last 10-15 years, I’ve been an avid genealogist. I am currently the archivist of my family’s stories, photos, and details. I’ve bugged my Mom and Aunts relentlessly to share with me their knowledge. They’ve been very generous with their time and stash of photos. A large amount of those photos came as CABINET CARDS. Cabinet cards became popular after the Civil War (cir 1870-1880) as portrait photography. They are generally 4x6, black and white (sometimes hand-tinted), on sturdy pressed paper cards.
Third, Let me say…this is MY METHOD for cropping, resizing, and adjusting photos. I know there are easier ways (for example, it can all be done in Photoshop) but this works for me. Please adjust to meet your needs.
So let's play with 3 of my favorite “Great-greats"!
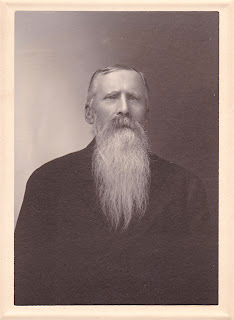
Meet my Great-great-grandfather, Nels Anderson. Nels left southwestern Norway in 1856 at the age of 20. He settled in Wisconsin and worked for several years as a farm hand. When he had $300 saved he went back to New York, got on a ship bound for Panama, WALKED across the Panama Isthmus, got on another ship bound for San Francisco, and joined the California gold rush (10 years late - 1859). What he did there remains a mystery (for now - I'm hoping to find out one day), but he eventually returned to Wisconsin and married Christina (below).
I started by scanning Nel’s photo. I crop and resize in Microsoft Office 2010 (in earlier editions it’s called Microsoft Office Picture Manager). Select your photo in the folder, right click, selected “OPEN WITH” select Picture Manager (you can check the box at the bottom to make this standard), and EDIT the photo. If you make it a standard, you can right click and EDIT, without the other steps.
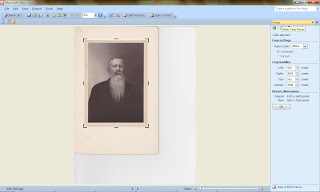
I start by cropping to the size I want. Use your mouse to move the brackets to frame the edges of the photo. I didn’t need all the white cardstock around the photo, so I removed it.
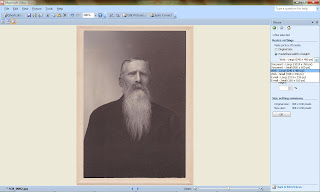
Next I resize. This just means making it a standard pixel size. You probably won’t notice a difference other than the size of the JPEG file. I always select WEB – LARGE 640x480.
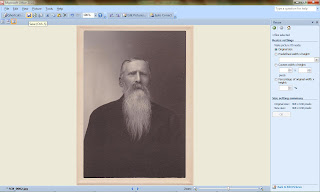
And then I save and exit from Picture Manager.
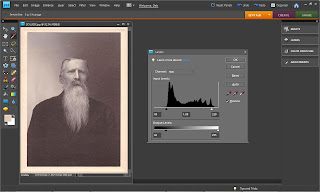
***WARNING: I have Photoshop – but I’m new to it and can’t do much other than adjust the light/dark settings.***
Press Ctrl+L ("Ctrl+L" = pressing both the Ctrl key and L at the same time) and the little levels box will display. I move the arrows in on both sides until they are under the first spike. You can move the middle arrow to the left to lighten the picture. Press OK. This is generally where I finish editing my pictures. Ctrl+S will bring up the Save box.
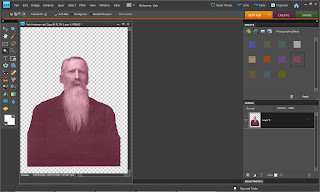
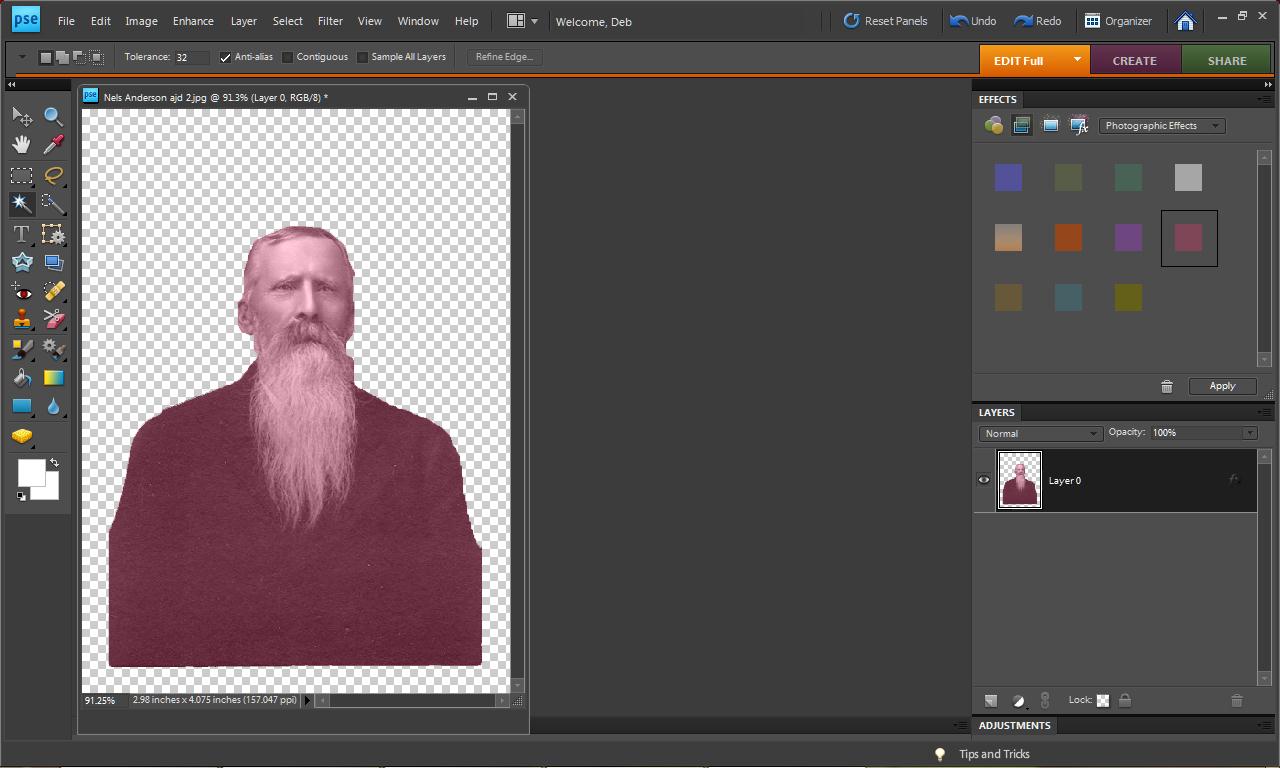
But I wanted to try colorizing Nels for this project. (I removed the background but it's not necessary.) Under WINDOWS open the EFFECTS - PHOTOGRAPHIC EFFECTS. Click on one of the colors and drag to your photo. Ctrl+z will reverse the colorization. When you're happy -- SAVE IT!
So, let’s be honest here…I love Nels’ beard but honestly he looks a bit like a garden gnome. (am I right?) So I paired him with Retro Art Café’s Vintage Botanical Images Collage Sheet by Debrina Pratt - DP188. (I think he's approve of being a gnome...he was a farmer after all).
Just a final note. I also have received a few tintypes (depending on the developing method they are called different things, tintype is a generic term). These are photographs that were chemically etched onto tin/metal sheets. Exposure to light and air degrades the image over time. Most of the tintypes I have now are nearly black. As a result the images are almost gone. To my knowledge there is nothing you can do to restore the image on the metal. If you have any tintypes, I encourage you to get them scanned and digitally preserved ASAP! If you don’t have a scanner, most copy shops can do it for you. A one-time scan will not do more damage, but will preserve the image for future generations.
I used Photoshop to clean up these two tintypes:
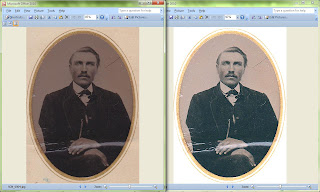
My Great-great-grandfather, John Quammen.
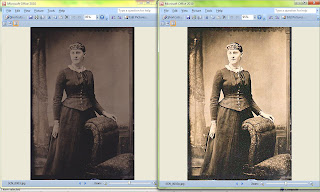
My Great-great-grandmother, Christina Williams Anderson (Nel’s wife).
And here they are “Glammed Up” on those great Retro Art Café backgrounds!
I hope I’ve inspired you to preserve (and have a little fun with) your ancestors!!
First, this is my last tutorial for Gingersnap Creations…I’ve had such a great time this last year sharing some of my creative journey with you. Thank you Shar & Ali for your leadership!
Second, I was so excited to see this month’s HERITAGE theme. For the last 10-15 years, I’ve been an avid genealogist. I am currently the archivist of my family’s stories, photos, and details. I’ve bugged my Mom and Aunts relentlessly to share with me their knowledge. They’ve been very generous with their time and stash of photos. A large amount of those photos came as CABINET CARDS. Cabinet cards became popular after the Civil War (cir 1870-1880) as portrait photography. They are generally 4x6, black and white (sometimes hand-tinted), on sturdy pressed paper cards.
Third, Let me say…this is MY METHOD for cropping, resizing, and adjusting photos. I know there are easier ways (for example, it can all be done in Photoshop) but this works for me. Please adjust to meet your needs.
So let's play with 3 of my favorite “Great-greats"!
Meet my Great-great-grandfather, Nels Anderson. Nels left southwestern Norway in 1856 at the age of 20. He settled in Wisconsin and worked for several years as a farm hand. When he had $300 saved he went back to New York, got on a ship bound for Panama, WALKED across the Panama Isthmus, got on another ship bound for San Francisco, and joined the California gold rush (10 years late - 1859). What he did there remains a mystery (for now - I'm hoping to find out one day), but he eventually returned to Wisconsin and married Christina (below).I started by scanning Nel’s photo. I crop and resize in Microsoft Office 2010 (in earlier editions it’s called Microsoft Office Picture Manager). Select your photo in the folder, right click, selected “OPEN WITH” select Picture Manager (you can check the box at the bottom to make this standard), and EDIT the photo. If you make it a standard, you can right click and EDIT, without the other steps.
I start by cropping to the size I want. Use your mouse to move the brackets to frame the edges of the photo. I didn’t need all the white cardstock around the photo, so I removed it.
Next I resize. This just means making it a standard pixel size. You probably won’t notice a difference other than the size of the JPEG file. I always select WEB – LARGE 640x480.
And then I save and exit from Picture Manager.
***WARNING: I have Photoshop – but I’m new to it and can’t do much other than adjust the light/dark settings.***Press Ctrl+L ("Ctrl+L" = pressing both the Ctrl key and L at the same time) and the little levels box will display. I move the arrows in on both sides until they are under the first spike. You can move the middle arrow to the left to lighten the picture. Press OK. This is generally where I finish editing my pictures. Ctrl+S will bring up the Save box.
But I wanted to try colorizing Nels for this project. (I removed the background but it's not necessary.) Under WINDOWS open the EFFECTS - PHOTOGRAPHIC EFFECTS. Click on one of the colors and drag to your photo. Ctrl+z will reverse the colorization. When you're happy -- SAVE IT!So, let’s be honest here…I love Nels’ beard but honestly he looks a bit like a garden gnome. (am I right?) So I paired him with Retro Art Café’s Vintage Botanical Images Collage Sheet by Debrina Pratt - DP188. (I think he's approve of being a gnome...he was a farmer after all).
Just a final note. I also have received a few tintypes (depending on the developing method they are called different things, tintype is a generic term). These are photographs that were chemically etched onto tin/metal sheets. Exposure to light and air degrades the image over time. Most of the tintypes I have now are nearly black. As a result the images are almost gone. To my knowledge there is nothing you can do to restore the image on the metal. If you have any tintypes, I encourage you to get them scanned and digitally preserved ASAP! If you don’t have a scanner, most copy shops can do it for you. A one-time scan will not do more damage, but will preserve the image for future generations.
I used Photoshop to clean up these two tintypes:
My Great-great-grandfather, John Quammen.
My Great-great-grandmother, Christina Williams Anderson (Nel’s wife).And here they are “Glammed Up” on those great Retro Art Café backgrounds!
I hope I’ve inspired you to preserve (and have a little fun with) your ancestors!!
Wednesday, March 14, 2012
GC142: Border Punches
This month at Gingersnap Creations we're celebrating our heritage. I planned to use my own family pictures in my pieces. (More on that in a bit...)
We also have a FAB! sponsor Retro Art Cafe, who generously let us pick digital collage sheets to use in our creations. When I saw the Ferris Wheel on the Circus Collage Sheet by Debrina Pratt - DP178 #DP178 sheet, I *KNEW* what I was going to do! I have a black & white photo taken in the 1960's of my Uncle Ron in his Air Force uniform and some shiny Ray-Ban sunglasses. Unfortunately, after 2 hours (at both my house and my mom's) AND 20 boxes of old photos....I *COULD NOT* find the photo. So I turned to the handy Google and started looking for a period photo that was similar. I found "Bob" here in a Ray-Ban ad, of all places. (grin)
Our challenge this week was to use border punches. I used two border punches and one corner punch. I remember a cool technique by Becca Feekan (Amazing Paper Grace) using corner punches to create an inner border. I used an old Stampin Up! punch to create the blue inner border. The outer border was done with a Martha set (corner and border).
I wanted to show you a close up of "Bob's" sun glasses and mouth. I used Glossy Accents on the lens. His mouth is one of those subtle details that makes me giggle. I used a cherry soda bottle cap. I thought his lips might be red after drinking a cherry soda...so with my R37 Copic and the blending marker - I painted his lips. To get a really subtle color use brush some color off your marker with the tip of the blender. To clean the color off the blender just rub it on a scrap paper. Good as new!!
We also have a FAB! sponsor Retro Art Cafe, who generously let us pick digital collage sheets to use in our creations. When I saw the Ferris Wheel on the Circus Collage Sheet by Debrina Pratt - DP178 #DP178 sheet, I *KNEW* what I was going to do! I have a black & white photo taken in the 1960's of my Uncle Ron in his Air Force uniform and some shiny Ray-Ban sunglasses. Unfortunately, after 2 hours (at both my house and my mom's) AND 20 boxes of old photos....I *COULD NOT* find the photo. So I turned to the handy Google and started looking for a period photo that was similar. I found "Bob" here in a Ray-Ban ad, of all places. (grin)
Wednesday, March 7, 2012
GC141: Granny's Photo Album
Greetings from Cannon Beach Oregon!!! I took a 4-day weekend and my stamping goodies on the road.
I'm both excited about this month's theme (Family Heritage - I do TONS of genealogy!!) at Gingersnap Creations (it's also our birthday month!). But also sad because this month wraps up Gingersnap Creations weekly challenges. The blog will continue to be available as inspiration, but founding femmes, Shar and Ali are starting new challenges. Best wishes ladies!!!
Today on Gingersnap Creations, we're celebrating GRANNY'S PHOTO ALBUM. It use to be that when I thought of "granny", my grandmother (late 50's/early 60's, tight curled grey hair, and master maker of chocolate chip cookies) came to mind. But these days, I think of my sister, Laura (running marathons). Laura is anything but "granny" like...she's not even 50 yet.
I've been itching to work on these mini shadowboxes. In fact, I bought three of them before Christmas with the intention of doing these as gifts. I guess the universe decided I needed to wait for this challenge. My muse this week is the newest grandbaby in the family, my great nephew, Julian. Julian is 17 mos old and will soon have a new sister/brother. This photo was taken with my iPhone at Thanksgiving.
My mom has rented a beach house in Cannon Beach for 6 weeks. This is her view and beach access. Stamping on the road can be fun. You are forced to work with the supplies you have with you, so creativity a must. I decided to incorporate a little bit of beach in my creation. Finding little containers to hold sand was a challenge. In the end I used a small vial and will transfer to a Tim glass bottle when I get home.
Our Gingersnap sponsor is month is Retro Art Cafe. For background art I used ATC Size Collage Sheet by Debrina Pratt - DP104.
Please join us at Gingersnap Creations for our last month of challenges!
I'm both excited about this month's theme (Family Heritage - I do TONS of genealogy!!) at Gingersnap Creations (it's also our birthday month!). But also sad because this month wraps up Gingersnap Creations weekly challenges. The blog will continue to be available as inspiration, but founding femmes, Shar and Ali are starting new challenges. Best wishes ladies!!!
Today on Gingersnap Creations, we're celebrating GRANNY'S PHOTO ALBUM. It use to be that when I thought of "granny", my grandmother (late 50's/early 60's, tight curled grey hair, and master maker of chocolate chip cookies) came to mind. But these days, I think of my sister, Laura (running marathons). Laura is anything but "granny" like...she's not even 50 yet.
Please join us at Gingersnap Creations for our last month of challenges!
Wednesday, February 29, 2012
1GCSP11: LEAP Year!
HAPPY LEAP DAY!!
Today on Gingersnap Creations we're celebrating with a Blue Moon challenge - THINGS THAT LEAP!
My leaper (ok - hopper) is a stamp I've had for a while. I like cute. But cute doesn't always like me. (wink) So this poor fellow sat around for a while.
My intention was an Easter card, but then I found this Inky Antics sentiment (also collecting dust), and I couldn't help myself. A birthday card was born!
The bunny and carrots were colored with Copics.
And highlighted with glitter pens.
Stamps: RubberNecker Stamps (rabbit & carrots); Inky Antics sentiment
Ink: Memento
Paper: Bo Bunny
Accessories: Copics & glitter pens
Today on Gingersnap Creations we're celebrating with a Blue Moon challenge - THINGS THAT LEAP!
My leaper (ok - hopper) is a stamp I've had for a while. I like cute. But cute doesn't always like me. (wink) So this poor fellow sat around for a while.
Stamps: RubberNecker Stamps (rabbit & carrots); Inky Antics sentiment
Ink: Memento
Paper: Bo Bunny
Accessories: Copics & glitter pens
Wednesday, February 8, 2012
GC138: Masking Tape (washi tape) Thank Yous
This month on Gingersnap Creations we're celebrating WORDS OF WISDOM.
Are "Please" and "Thank You" words of wisdom? Maybe. Maybe not. But good manners never go out of style. Most people buy a pack of 10 thank you cards and get them right out after receiving a gift. Me (and I'll bet you) have to make a thank you card. And they never seem to get out the door. So this year, I decided to go with clean and simple (CAS) thanks you!
This week's Gingersnap challenge is Masking Tape. I morphed that one a bit into washi tape. My friend, Heather, LOVES the stuff. And I have to admit I really like it too - but it's too "CLEAN" for me generally. So it's sits around looking pretty and I pet it now and then.
To make this a quick project as well as CAS...I started by buying a pack of envelopes and note cards from Archivers'.
I scored all the note cards in half and folded them.
Then I randomly stamped "thank you: on the fronts. Turning some upright and others sideways. There is no science to this one. Just STAMP!
Then I cut strips of washi tape and stuck it to the cards.


One of the great things about washi tape is that it's mostly transparent, so you get great shadows and effects by layering.
Enjoy!
(And yes...I did get them all mailed!)
Are "Please" and "Thank You" words of wisdom? Maybe. Maybe not. But good manners never go out of style. Most people buy a pack of 10 thank you cards and get them right out after receiving a gift. Me (and I'll bet you) have to make a thank you card. And they never seem to get out the door. So this year, I decided to go with clean and simple (CAS) thanks you!
This week's Gingersnap challenge is Masking Tape. I morphed that one a bit into washi tape. My friend, Heather, LOVES the stuff. And I have to admit I really like it too - but it's too "CLEAN" for me generally. So it's sits around looking pretty and I pet it now and then.
Enjoy!
(And yes...I did get them all mailed!)
Wednesday, January 18, 2012
GC135: Favorite Paper
Oops...the Monday holiday thru me. I forgot to get this posted this morning!
We're using up our scraps over at Gingersnap Creations this month. Today's challenge is to use your FAVORITE PAPER.
Well my "favorite" (can a paper hoarder have a favorite??) paper has long been Basic Grey. So I sorted thru my BG scraps and used my heart Nesties. Little Quasi here was stamped and colored with Copics. Fun and fast! AND USED SCRAPS!
Thanks to this month's sponsor Stampotique!
Stamps: Stampotique QUASI #6015; "GIVE SELF A HUG" #4010
Ink: Memento
Paper: Basic Grey scraps
Accessories: ribbon, Copics, heart Nestabilities
We're using up our scraps over at Gingersnap Creations this month. Today's challenge is to use your FAVORITE PAPER.
Thanks to this month's sponsor Stampotique!
Stamps: Stampotique QUASI #6015; "GIVE SELF A HUG" #4010
Ink: Memento
Paper: Basic Grey scraps
Accessories: ribbon, Copics, heart Nestabilities
Wednesday, January 11, 2012
GC134: Ribbon
Wow...this is my first blog post of 2012! HAPPY NEW YEAR!!
This month on the Gingersnap Creations blog we're getting organized! AND we have a fabulous sponsor this month - Stampotique Originals! Today we're cleaning up the RIBBON!
Getting organized for me that includes using bits and pieces that have been hang around my craft area - discarded from other projects.
The best way I've found to "glue" down ribbon scraps is to run them thru my Xyron sticker maker.
Take your bone folder and rub all over and around each edge to get a "clean" sticker.
Lay the ribbons down side by side and trim off the excess. I used scraps to paper piece Heart Throb and colored his head, hands and shoes with Copics.

Stamps: Stampotique HEART THROB #6057; "HUG ENCLOSED" #5244
Ink: Memento
Paper: scraps
Accessories: ribbon, Xryon label maker, pink puffy heart sticker
You have a month to create a Ribbon masterpiece and post it on Gingersnap Creations!
This month on the Gingersnap Creations blog we're getting organized! AND we have a fabulous sponsor this month - Stampotique Originals! Today we're cleaning up the RIBBON!
Stamps: Stampotique HEART THROB #6057; "HUG ENCLOSED" #5244
Ink: Memento
Paper: scraps
Accessories: ribbon, Xryon label maker, pink puffy heart sticker
You have a month to create a Ribbon masterpiece and post it on Gingersnap Creations!
Wednesday, December 28, 2011
GC132: Soft Yellow and White
This month's color challenge at Gingersnap Creations is Soft Yellow and White. Ok...so this isn't a soft yellow, but I love the snow flake paper by Graphic 45.
Sorry I can't remember where I got the angel stamp. She's colored with most of my yellow Copics. And I had to make her a "ginger"!
Please join us and post your soft yellow and white creation on the Gingersnap Creations blog. You have a month and you might just become a GINGER GEM!
Saturday, December 17, 2011
Gingersnap Creations: Beeswax
Please hop on over to Gingersnap Creations for a step-by-step on my creative journey with beeswax.

I can't say it's a tutorial but I do share what worked and didn't work for me.
Wednesday, December 7, 2011
GC129: Starry Night
This December, Gingersnap Creations is celebrating Holiday Lights and we will be focusing on candles, votive holders and all things wax.
For today's project I'm focusing on a luminary for a votive or tea light. It's a quick project with lots of possibilities. Different shaped windows, embossed vellum windows, different die-cut edges - the list goes on and on! The tutorial is on SplitCoast Stampers.
I started with a 12x12 piece of silver glitter paper. I cut the piece a bit longer than 5.5" called for in the tutorial because I wanted to die-cut the top edge.

To cut the window, I drew a pencil line inside and then positioned the nestie with washi tape. I folded the box in half to cut the top. The polar bear is a Memory box stamp. And I die cut stars and covered them with blue glitter embossing powder. If I could have found a tea light or votive I would have fired it up for you. Sadly all the little candles are in a "very safe place" right now.
These are the Copics I used. The warm greys are great for shadows.
I hope to have a second post today inspired by Tim's Day#7 tag...stay tuned!
For today's project I'm focusing on a luminary for a votive or tea light. It's a quick project with lots of possibilities. Different shaped windows, embossed vellum windows, different die-cut edges - the list goes on and on! The tutorial is on SplitCoast Stampers.
I started with a 12x12 piece of silver glitter paper. I cut the piece a bit longer than 5.5" called for in the tutorial because I wanted to die-cut the top edge.
I hope to have a second post today inspired by Tim's Day#7 tag...stay tuned!
Wednesday, November 9, 2011
GC126: Raffia
Do you have a bag of raffia? Did you buy it in the '80's? I did...and I still have a full bag!!!
What is it about Raffia that it self-generates when you're not using it? LOL.
WELL TIME TO USE IT!!! This week on Gingersnap Creations we're looking for your Raffia art!
This is a 6x6 piece. This month's sponsor at Gingersnap Creations is
Rogue Redhead Designs. I'm proud to be a design team member at RRD, so I needed to use my FLORICULTURE set on this piece. RRD is also celebrating their 1 year anniversary. Stop by for some great bundling specials! The sunflowers, sun face, and leaves are all part of that set. The girl was clip art hanging around my desk.
We're also focusing on beads and seeds at Gingersnap Creations. I used micro beads for the sunflower centers. It gives a really nice texture!
Get out your Raffia and show us your art at Gingersnap Creations!
What is it about Raffia that it self-generates when you're not using it? LOL.
WELL TIME TO USE IT!!! This week on Gingersnap Creations we're looking for your Raffia art!
Rogue Redhead Designs. I'm proud to be a design team member at RRD, so I needed to use my FLORICULTURE set on this piece. RRD is also celebrating their 1 year anniversary. Stop by for some great bundling specials! The sunflowers, sun face, and leaves are all part of that set. The girl was clip art hanging around my desk.
Get out your Raffia and show us your art at Gingersnap Creations!
Wednesday, November 2, 2011
GC125: Farm Fresh
Well I have to say I'm sad to leave POE month behind on Gingersnap Creations. I love all the spooky goodness that was created and displayed over there!
November we head to ON THE FARM with a focus on seeds and beads.
Recently I've been loving the color block stamping, so I had to give it a try. And yes, I know it looks like the rooster is laying eggs (there was no hen stamp).
Stamps: Oxford Impressions COUNTRY GIRL
Ink: Amuse Studio inks; Archival Black
Paper: Amuse Studio kraft & Cherry
Accessories: red brads, 1/8" red line tape, sesame seeds, red Scrappers Floss
Hope you join us at Gingersnap Creations with your Farm Fresh creations!
November we head to ON THE FARM with a focus on seeds and beads.
Stamps: Oxford Impressions COUNTRY GIRL
Ink: Amuse Studio inks; Archival Black
Paper: Amuse Studio kraft & Cherry
Accessories: red brads, 1/8" red line tape, sesame seeds, red Scrappers Floss
Hope you join us at Gingersnap Creations with your Farm Fresh creations!
Wednesday, October 19, 2011
A Murder of Ravens & Dr Paine’s Apothecary!
Today’s Random Redhead Challenge at Gingersnap Creations is RAVENS! And it’s the perfect tie-in to the class I’ll be teaching at ONE LITTLE SPARK in Little Egg Harbor, NJ this SATURDAY, October 22nd!
This tag is one of the projects in the class – A MURDER OF RAVENS. All the cards/tags in this class have a raven theme.
Here’s the class description: Did you know a flock of ravens is called a "murder?" Neither did we until Deb shared her fabulous Halloween class designs with us! You'll learn tons of great new techniques, while making gorgeous cards and this great tag in her Murder of Ravens class.
The 2nd class I’ll be teaching is Configurations Box where we’ll create DR. PAINE’S APOTHECARY – full of creepy crawly potions! I don’t have a full picture of the box but here are a few highlights.


Here’s the class description: Using products from Tim Holtz and 7Gypsies (just to name a few) you'll have a blast creating this fabulously spooky curio cabinet!
If you live in the area, I hope you’ll join us! And a special thanks to Heather for taking such great pictures of my stuff!
This tag is one of the projects in the class – A MURDER OF RAVENS. All the cards/tags in this class have a raven theme.Here’s the class description: Did you know a flock of ravens is called a "murder?" Neither did we until Deb shared her fabulous Halloween class designs with us! You'll learn tons of great new techniques, while making gorgeous cards and this great tag in her Murder of Ravens class.
The 2nd class I’ll be teaching is Configurations Box where we’ll create DR. PAINE’S APOTHECARY – full of creepy crawly potions! I don’t have a full picture of the box but here are a few highlights.


Here’s the class description: Using products from Tim Holtz and 7Gypsies (just to name a few) you'll have a blast creating this fabulously spooky curio cabinet!If you live in the area, I hope you’ll join us! And a special thanks to Heather for taking such great pictures of my stuff!
Saturday, October 15, 2011
Poe Mini Album
I love October! The leaves are changing. The countdown to Halloween is ticking away. And the CANDY CORN IS OUT!! (yes, I'm addicted to candy corn).
In celebration of All Things POE this month at Gingersnap Creations, I wanted to share this quick little mini album I created for my Poe.
Here's the finished album. It's 4x4 and about inch thick. AND! It can hold as many pictures as you want to add.
The supply list is pretty basic. 2 coasters (4x4), 18" ribbon, 2 pieces of double sided card stock cut 4x12, 4x4 piece of coordinating paper, 12x12 card stock for the accordion pages, and Red Line tape.
Start by covering both sides of each coaster with tape. Trim off excess tape.
Cut the ribbon in half. Remove the protective tape covers from one side and stick the ribbon in the middle of the coaster.
Lay each piece face down, ribbon out on one of the 4x12 papers. Place a piece of Red Line tape in the spine. Trim the extra paper off the corners. Remove all the protective tape covers.
Then slowly (because once it's down...it's down!) lay the other 4x12 paper on the inside. Trim the excess paper.
Cut a coordinating 4x4 paper for the outside of the spine. Lay it in the middle of the outside of the album. Gently pull both sides together and tie them. This will make the spine curve.
Cut your 12x12 piece of card stock 3 3/4" x 12". You'll get 3 pages. You can cut as many papers as you need. You may want to glue half to each album cover.
Score each strip every 3 3/4". I flipped my pages over after each score to help me pleat the papers. You will end up with a small tab at the end. Run tape down the tab, press to the next strip. On the last strip, cut the tab off. Pleat the papers.
Apply tape to one side of the stack.
Press into the album.
I liked the pleated paper to pull in the opposite direction.
Fill with photos of your favorite spook! I used some spooky pictures from my Hipstamatic iPhone app!
So where is Poe, you ask? Well, if you've read my Gingersnap bio...you know I adopted a rescue cat last Halloween. I named her Edgar ELLEN Poe...or Poe for short. (I love that her initials are E.E.P.!!)
Enjoy!!
In celebration of All Things POE this month at Gingersnap Creations, I wanted to share this quick little mini album I created for my Poe.
Enjoy!!
Subscribe to:
Posts (Atom)