Unruly PaperArts has a Yahoo Group that has monthly swaps. I decided to join the "nature" swap. In this swap you create your art piece and post a picture to the group page. The hostess then assigns swap partners and you send your ATC directly to the new owner. (BRILLIANT!) So much faster than sending it to hostess, who sorts it out, and then returns it to you.
My little ATC here was the lone entry in NATURE. So I swapped with the lone entry in another category. And got two back!
Thanks Shar!!
Showing posts with label collage. Show all posts
Wednesday, August 8, 2012
Wednesday, March 28, 2012
My Final Ginger
So sad!
This is the last post I will do for Gingersnap Creations. It's been a very fun year!!
This last challenge is the annual color challenge - GC144: Copper, Rust, and Ginger. I know it looks yellow here but I used Wild Honey as the main color!
I did a 6x6 card using Retro Art Cafe's wonder digital collage sheets. #037 Oh Baby 2 and #DP188 Vintage Botanical Images.
I did a lot of layering on this piece.
Stop by Gingersnap Creations and look at all the beautiful art created by the talented design team!
This is the last post I will do for Gingersnap Creations. It's been a very fun year!!
This last challenge is the annual color challenge - GC144: Copper, Rust, and Ginger. I know it looks yellow here but I used Wild Honey as the main color!
I did a 6x6 card using Retro Art Cafe's wonder digital collage sheets. #037 Oh Baby 2 and #DP188 Vintage Botanical Images.
I did a lot of layering on this piece.
Stop by Gingersnap Creations and look at all the beautiful art created by the talented design team!
Saturday, March 17, 2012
Gingersnap Creations: Altered Cabinet Cards
Oh, I don’t know where to start!
First, this is my last tutorial for Gingersnap Creations…I’ve had such a great time this last year sharing some of my creative journey with you. Thank you Shar & Ali for your leadership!
Second, I was so excited to see this month’s HERITAGE theme. For the last 10-15 years, I’ve been an avid genealogist. I am currently the archivist of my family’s stories, photos, and details. I’ve bugged my Mom and Aunts relentlessly to share with me their knowledge. They’ve been very generous with their time and stash of photos. A large amount of those photos came as CABINET CARDS. Cabinet cards became popular after the Civil War (cir 1870-1880) as portrait photography. They are generally 4x6, black and white (sometimes hand-tinted), on sturdy pressed paper cards.
Third, Let me say…this is MY METHOD for cropping, resizing, and adjusting photos. I know there are easier ways (for example, it can all be done in Photoshop) but this works for me. Please adjust to meet your needs.
So let's play with 3 of my favorite “Great-greats"!
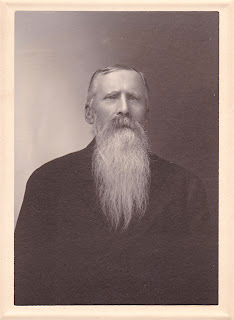
Meet my Great-great-grandfather, Nels Anderson. Nels left southwestern Norway in 1856 at the age of 20. He settled in Wisconsin and worked for several years as a farm hand. When he had $300 saved he went back to New York, got on a ship bound for Panama, WALKED across the Panama Isthmus, got on another ship bound for San Francisco, and joined the California gold rush (10 years late - 1859). What he did there remains a mystery (for now - I'm hoping to find out one day), but he eventually returned to Wisconsin and married Christina (below).
I started by scanning Nel’s photo. I crop and resize in Microsoft Office 2010 (in earlier editions it’s called Microsoft Office Picture Manager). Select your photo in the folder, right click, selected “OPEN WITH” select Picture Manager (you can check the box at the bottom to make this standard), and EDIT the photo. If you make it a standard, you can right click and EDIT, without the other steps.
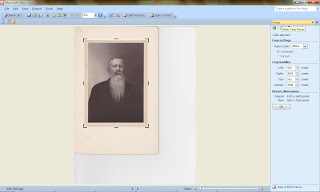
I start by cropping to the size I want. Use your mouse to move the brackets to frame the edges of the photo. I didn’t need all the white cardstock around the photo, so I removed it.
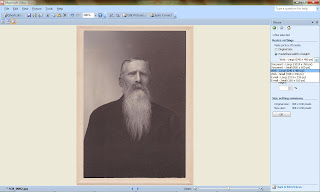
Next I resize. This just means making it a standard pixel size. You probably won’t notice a difference other than the size of the JPEG file. I always select WEB – LARGE 640x480.
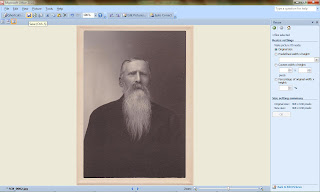
And then I save and exit from Picture Manager.
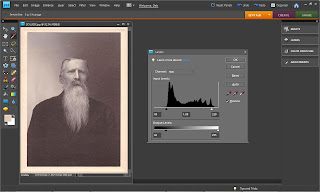
***WARNING: I have Photoshop – but I’m new to it and can’t do much other than adjust the light/dark settings.***
Press Ctrl+L ("Ctrl+L" = pressing both the Ctrl key and L at the same time) and the little levels box will display. I move the arrows in on both sides until they are under the first spike. You can move the middle arrow to the left to lighten the picture. Press OK. This is generally where I finish editing my pictures. Ctrl+S will bring up the Save box.
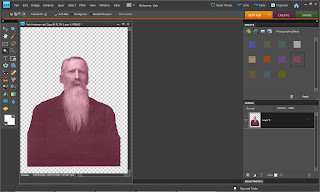
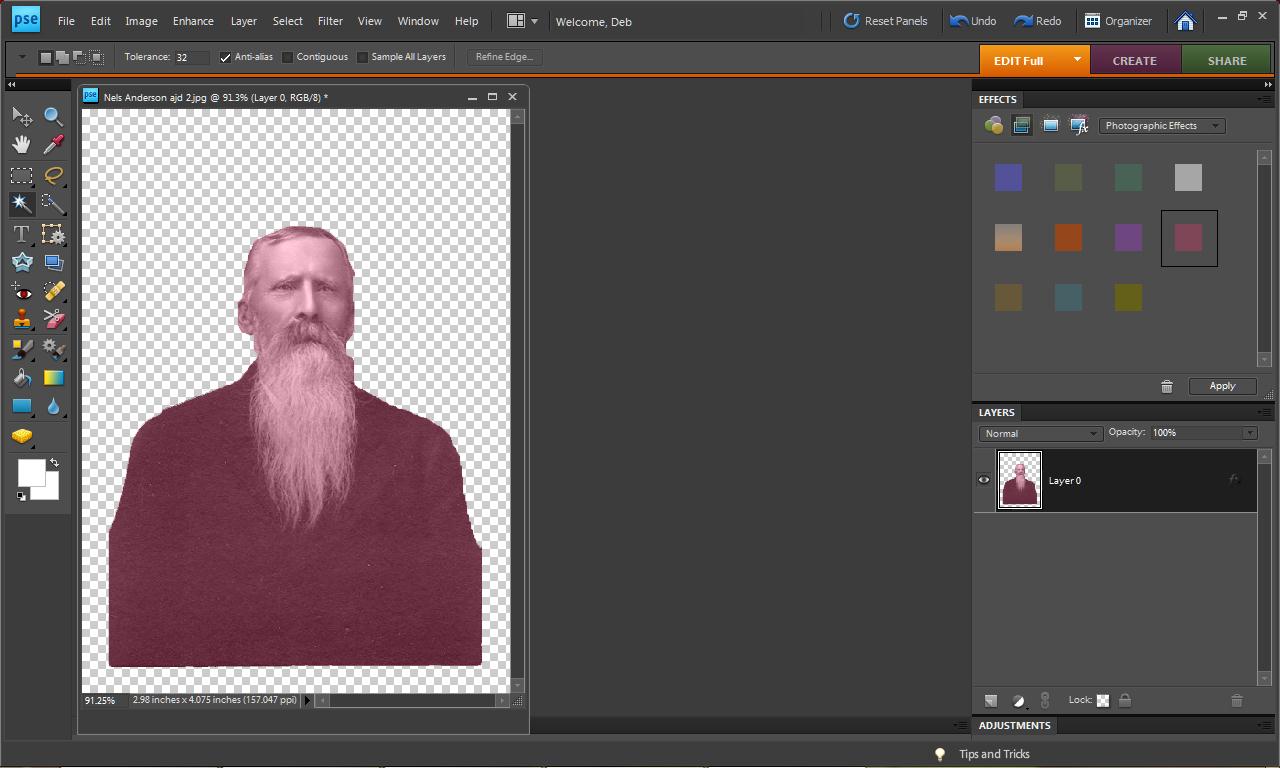
But I wanted to try colorizing Nels for this project. (I removed the background but it's not necessary.) Under WINDOWS open the EFFECTS - PHOTOGRAPHIC EFFECTS. Click on one of the colors and drag to your photo. Ctrl+z will reverse the colorization. When you're happy -- SAVE IT!
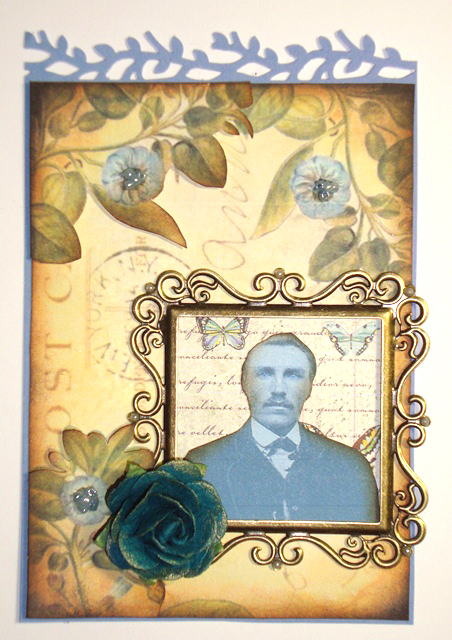
So, let’s be honest here…I love Nels’ beard but honestly he looks a bit like a garden gnome. (am I right?) So I paired him with Retro Art Café’s Vintage Botanical Images Collage Sheet by Debrina Pratt - DP188. (I think he's approve of being a gnome...he was a farmer after all).
Just a final note. I also have received a few tintypes (depending on the developing method they are called different things, tintype is a generic term). These are photographs that were chemically etched onto tin/metal sheets. Exposure to light and air degrades the image over time. Most of the tintypes I have now are nearly black. As a result the images are almost gone. To my knowledge there is nothing you can do to restore the image on the metal. If you have any tintypes, I encourage you to get them scanned and digitally preserved ASAP! If you don’t have a scanner, most copy shops can do it for you. A one-time scan will not do more damage, but will preserve the image for future generations.
I used Photoshop to clean up these two tintypes:
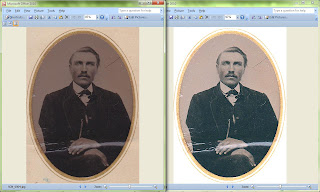
My Great-great-grandfather, John Quammen.
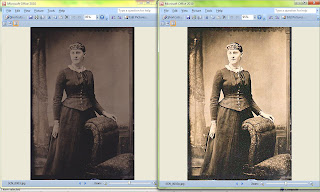
My Great-great-grandmother, Christina Williams Anderson (Nel’s wife).
And here they are “Glammed Up” on those great Retro Art Café backgrounds!
I hope I’ve inspired you to preserve (and have a little fun with) your ancestors!!
First, this is my last tutorial for Gingersnap Creations…I’ve had such a great time this last year sharing some of my creative journey with you. Thank you Shar & Ali for your leadership!
Second, I was so excited to see this month’s HERITAGE theme. For the last 10-15 years, I’ve been an avid genealogist. I am currently the archivist of my family’s stories, photos, and details. I’ve bugged my Mom and Aunts relentlessly to share with me their knowledge. They’ve been very generous with their time and stash of photos. A large amount of those photos came as CABINET CARDS. Cabinet cards became popular after the Civil War (cir 1870-1880) as portrait photography. They are generally 4x6, black and white (sometimes hand-tinted), on sturdy pressed paper cards.
Third, Let me say…this is MY METHOD for cropping, resizing, and adjusting photos. I know there are easier ways (for example, it can all be done in Photoshop) but this works for me. Please adjust to meet your needs.
So let's play with 3 of my favorite “Great-greats"!
Meet my Great-great-grandfather, Nels Anderson. Nels left southwestern Norway in 1856 at the age of 20. He settled in Wisconsin and worked for several years as a farm hand. When he had $300 saved he went back to New York, got on a ship bound for Panama, WALKED across the Panama Isthmus, got on another ship bound for San Francisco, and joined the California gold rush (10 years late - 1859). What he did there remains a mystery (for now - I'm hoping to find out one day), but he eventually returned to Wisconsin and married Christina (below).I started by scanning Nel’s photo. I crop and resize in Microsoft Office 2010 (in earlier editions it’s called Microsoft Office Picture Manager). Select your photo in the folder, right click, selected “OPEN WITH” select Picture Manager (you can check the box at the bottom to make this standard), and EDIT the photo. If you make it a standard, you can right click and EDIT, without the other steps.
I start by cropping to the size I want. Use your mouse to move the brackets to frame the edges of the photo. I didn’t need all the white cardstock around the photo, so I removed it.
Next I resize. This just means making it a standard pixel size. You probably won’t notice a difference other than the size of the JPEG file. I always select WEB – LARGE 640x480.
And then I save and exit from Picture Manager.
***WARNING: I have Photoshop – but I’m new to it and can’t do much other than adjust the light/dark settings.***Press Ctrl+L ("Ctrl+L" = pressing both the Ctrl key and L at the same time) and the little levels box will display. I move the arrows in on both sides until they are under the first spike. You can move the middle arrow to the left to lighten the picture. Press OK. This is generally where I finish editing my pictures. Ctrl+S will bring up the Save box.
But I wanted to try colorizing Nels for this project. (I removed the background but it's not necessary.) Under WINDOWS open the EFFECTS - PHOTOGRAPHIC EFFECTS. Click on one of the colors and drag to your photo. Ctrl+z will reverse the colorization. When you're happy -- SAVE IT!So, let’s be honest here…I love Nels’ beard but honestly he looks a bit like a garden gnome. (am I right?) So I paired him with Retro Art Café’s Vintage Botanical Images Collage Sheet by Debrina Pratt - DP188. (I think he's approve of being a gnome...he was a farmer after all).
Just a final note. I also have received a few tintypes (depending on the developing method they are called different things, tintype is a generic term). These are photographs that were chemically etched onto tin/metal sheets. Exposure to light and air degrades the image over time. Most of the tintypes I have now are nearly black. As a result the images are almost gone. To my knowledge there is nothing you can do to restore the image on the metal. If you have any tintypes, I encourage you to get them scanned and digitally preserved ASAP! If you don’t have a scanner, most copy shops can do it for you. A one-time scan will not do more damage, but will preserve the image for future generations.
I used Photoshop to clean up these two tintypes:
My Great-great-grandfather, John Quammen.
My Great-great-grandmother, Christina Williams Anderson (Nel’s wife).And here they are “Glammed Up” on those great Retro Art Café backgrounds!
I hope I’ve inspired you to preserve (and have a little fun with) your ancestors!!
Wednesday, March 14, 2012
GC142: Border Punches
This month at Gingersnap Creations we're celebrating our heritage. I planned to use my own family pictures in my pieces. (More on that in a bit...)
We also have a FAB! sponsor Retro Art Cafe, who generously let us pick digital collage sheets to use in our creations. When I saw the Ferris Wheel on the Circus Collage Sheet by Debrina Pratt - DP178 #DP178 sheet, I *KNEW* what I was going to do! I have a black & white photo taken in the 1960's of my Uncle Ron in his Air Force uniform and some shiny Ray-Ban sunglasses. Unfortunately, after 2 hours (at both my house and my mom's) AND 20 boxes of old photos....I *COULD NOT* find the photo. So I turned to the handy Google and started looking for a period photo that was similar. I found "Bob" here in a Ray-Ban ad, of all places. (grin)
Our challenge this week was to use border punches. I used two border punches and one corner punch. I remember a cool technique by Becca Feekan (Amazing Paper Grace) using corner punches to create an inner border. I used an old Stampin Up! punch to create the blue inner border. The outer border was done with a Martha set (corner and border).
I wanted to show you a close up of "Bob's" sun glasses and mouth. I used Glossy Accents on the lens. His mouth is one of those subtle details that makes me giggle. I used a cherry soda bottle cap. I thought his lips might be red after drinking a cherry soda...so with my R37 Copic and the blending marker - I painted his lips. To get a really subtle color use brush some color off your marker with the tip of the blender. To clean the color off the blender just rub it on a scrap paper. Good as new!!
We also have a FAB! sponsor Retro Art Cafe, who generously let us pick digital collage sheets to use in our creations. When I saw the Ferris Wheel on the Circus Collage Sheet by Debrina Pratt - DP178 #DP178 sheet, I *KNEW* what I was going to do! I have a black & white photo taken in the 1960's of my Uncle Ron in his Air Force uniform and some shiny Ray-Ban sunglasses. Unfortunately, after 2 hours (at both my house and my mom's) AND 20 boxes of old photos....I *COULD NOT* find the photo. So I turned to the handy Google and started looking for a period photo that was similar. I found "Bob" here in a Ray-Ban ad, of all places. (grin)
Wednesday, March 7, 2012
GC141: Granny's Photo Album
Greetings from Cannon Beach Oregon!!! I took a 4-day weekend and my stamping goodies on the road.
I'm both excited about this month's theme (Family Heritage - I do TONS of genealogy!!) at Gingersnap Creations (it's also our birthday month!). But also sad because this month wraps up Gingersnap Creations weekly challenges. The blog will continue to be available as inspiration, but founding femmes, Shar and Ali are starting new challenges. Best wishes ladies!!!
Today on Gingersnap Creations, we're celebrating GRANNY'S PHOTO ALBUM. It use to be that when I thought of "granny", my grandmother (late 50's/early 60's, tight curled grey hair, and master maker of chocolate chip cookies) came to mind. But these days, I think of my sister, Laura (running marathons). Laura is anything but "granny" like...she's not even 50 yet.
I've been itching to work on these mini shadowboxes. In fact, I bought three of them before Christmas with the intention of doing these as gifts. I guess the universe decided I needed to wait for this challenge. My muse this week is the newest grandbaby in the family, my great nephew, Julian. Julian is 17 mos old and will soon have a new sister/brother. This photo was taken with my iPhone at Thanksgiving.
My mom has rented a beach house in Cannon Beach for 6 weeks. This is her view and beach access. Stamping on the road can be fun. You are forced to work with the supplies you have with you, so creativity a must. I decided to incorporate a little bit of beach in my creation. Finding little containers to hold sand was a challenge. In the end I used a small vial and will transfer to a Tim glass bottle when I get home.
Our Gingersnap sponsor is month is Retro Art Cafe. For background art I used ATC Size Collage Sheet by Debrina Pratt - DP104.
Please join us at Gingersnap Creations for our last month of challenges!
I'm both excited about this month's theme (Family Heritage - I do TONS of genealogy!!) at Gingersnap Creations (it's also our birthday month!). But also sad because this month wraps up Gingersnap Creations weekly challenges. The blog will continue to be available as inspiration, but founding femmes, Shar and Ali are starting new challenges. Best wishes ladies!!!
Today on Gingersnap Creations, we're celebrating GRANNY'S PHOTO ALBUM. It use to be that when I thought of "granny", my grandmother (late 50's/early 60's, tight curled grey hair, and master maker of chocolate chip cookies) came to mind. But these days, I think of my sister, Laura (running marathons). Laura is anything but "granny" like...she's not even 50 yet.
Please join us at Gingersnap Creations for our last month of challenges!
Thursday, March 1, 2012
Dean's 80th Birthday
First let me wish a very HAPPY BIRTHDAY to my cousin, Dean, who celebrates his 80th birthday this week!!! Dean is so full of life that it's hard to believe he's 80 now. So I wanted to do a FUN birthday card for him.
Like many of you, I've beecome addicted to Pinterest. I find it a great source of inspiration. I pinned this card recently and decided that Dean needed a candle for each decade. And that beautiful CAS card needed a little grunging up!
The finished card has a Red Lead background stamp. To lighten it up a bit I added some gesso on bubble wrap, and some texture with a small piece of cardboard.
To create the candles, I cut 8 strips (2.5 x 4) from a Bo Bunny pad of paper (so all the candles coordianted). To break down the stiff paper (and get it to roll tightly), I pulled it over a sharp corner several times.
A little quick drying glue along the edge. I cut small bits of Scrapper's Floss and stuck it in one end as a wick. And 8 paper candles were born.
Happy Birthday Dean!!
Like many of you, I've beecome addicted to Pinterest. I find it a great source of inspiration. I pinned this card recently and decided that Dean needed a candle for each decade. And that beautiful CAS card needed a little grunging up!
Happy Birthday Dean!!
Tuesday, February 14, 2012
Valentine's Tags & ATCs
I dug out all my Valentine goodies. I ordered some fun stuff this year too - wood hears from ArtChix, clipart from Collage Stuff and Red Lead, German scrap, ribbons and hearts. And then I did my best to channel Kris Dickinson. Kris has a collage style that I just drool over. I love every piece she makes and when she starts in with Halloween goodies...I'm in HEAVEN!
So if you're out there Kris...thanks for the never ending inspiration!


The ATC's were all made from "gift with purchase" packs from Collage Stuff.


I had a blast using up goodies I've had laying around for years! WOO HOO!
So if you're out there Kris...thanks for the never ending inspiration!
Monday, February 13, 2012
Valentine's Day Cards 2012
This year for Valentine's Day I did a matched set of cards. All "alike" in that they share the same papers and elements, but different because the paper varied so much in the words spread across the paper.
I started with my Tim Holtz cupid die and cut a bunch of them out of red glitter paper. I cut some cupids facing right and others facing left. Just flip the paper over (wink)!
The cards are all 4x4. With a bit of paper doily and red grosgrain ribbon. Simple but fun!
I started with my Tim Holtz cupid die and cut a bunch of them out of red glitter paper. I cut some cupids facing right and others facing left. Just flip the paper over (wink)!
Saturday, December 17, 2011
Gingersnap Creations: Beeswax
Please hop on over to Gingersnap Creations for a step-by-step on my creative journey with beeswax.

I can't say it's a tutorial but I do share what worked and didn't work for me.
Wednesday, November 9, 2011
GC126: Raffia
Do you have a bag of raffia? Did you buy it in the '80's? I did...and I still have a full bag!!!
What is it about Raffia that it self-generates when you're not using it? LOL.
WELL TIME TO USE IT!!! This week on Gingersnap Creations we're looking for your Raffia art!
This is a 6x6 piece. This month's sponsor at Gingersnap Creations is
Rogue Redhead Designs. I'm proud to be a design team member at RRD, so I needed to use my FLORICULTURE set on this piece. RRD is also celebrating their 1 year anniversary. Stop by for some great bundling specials! The sunflowers, sun face, and leaves are all part of that set. The girl was clip art hanging around my desk.
We're also focusing on beads and seeds at Gingersnap Creations. I used micro beads for the sunflower centers. It gives a really nice texture!
Get out your Raffia and show us your art at Gingersnap Creations!
What is it about Raffia that it self-generates when you're not using it? LOL.
WELL TIME TO USE IT!!! This week on Gingersnap Creations we're looking for your Raffia art!
Rogue Redhead Designs. I'm proud to be a design team member at RRD, so I needed to use my FLORICULTURE set on this piece. RRD is also celebrating their 1 year anniversary. Stop by for some great bundling specials! The sunflowers, sun face, and leaves are all part of that set. The girl was clip art hanging around my desk.
Get out your Raffia and show us your art at Gingersnap Creations!
Wednesday, October 5, 2011
GC121: Horror Stories
You're gonna love this month at GINGERSNAP CREATIONS! We're doing HALLOWEEN up right by paying homage to the original Dark Lord - EDGAR ALLEN POE!!
This week's challenge is Horror Stories.
I created a chunky ATC with the man himself...and his favorite muse, the Raven!
What's a chunky ATC...well....it's a wood block that's cut ATC sized. I only decorated the front but the back also calls out for some love.
My little raven was decorated with a party hat. I punched a 2-inch circle out. Cut it in half and then cut off about 1/3 of the half circle. It makes the perfect cone hat. The pom-pom was originally white and then rubbed on my Rusty Hinge pad.
I hope you'll join in the holiday merry making at Gingersnap Creations...why don't you start with you're own Horror Story!
(Almost all the supplies are from Red Lead PaperWorks.)
This week's challenge is Horror Stories.
(Almost all the supplies are from Red Lead PaperWorks.)
Tuesday, September 13, 2011
Encouraging Words Magnets
I joined a magnet swap on Gingersnap Creations - Encouraging Words Magnets. It's been awhile since I created art for a swap. I forgot how much fun it is!
There were just a few rules:
They needed to be between 2x2 and 4x4 - that means ATC in my book (2.5 x 3.5).
They needed to be a magnet.
They needed an inspiring sentiment.
Here are my 4 girls. They all had a cardboard ribbing background. A piece of patterned paper and clipart girl (Paper Whimsy). I added some gilded lace and a flower. And the sentiment and magnets of course!
Close up of my golden girls.
And a close-up of my blue girls.
There were just a few rules:
They needed to be between 2x2 and 4x4 - that means ATC in my book (2.5 x 3.5).
They needed to be a magnet.
They needed an inspiring sentiment.
Wednesday, July 20, 2011
Rogue Redhead: Floriculture Tag
It's Thursday! Time for another ROGUE REDHEAD DESIGNS entry!
A little summer goodness coming your way! I know most of the country is suffering heat and humidity, but I live in the mountains of Colorado. Right now there's a nice gentle rain falling (and believe me, we need it!)
I used the FLORICULTURE set to make this summery tag. I embossed the checker board and then sprayed with Colorwash and Glimmer Mist.

Stamps: Floriculture
Ink: Archival Ink: Coffee; Stampin' Up Old Olive
Paper: Tag, yellow pattern paper
Accessories: White embossing paper, gold bead, clipart by Red Lead, Colorwash spray, Glimmer Mist spray, ribbons.
A little summer goodness coming your way! I know most of the country is suffering heat and humidity, but I live in the mountains of Colorado. Right now there's a nice gentle rain falling (and believe me, we need it!)
I used the FLORICULTURE set to make this summery tag. I embossed the checker board and then sprayed with Colorwash and Glimmer Mist.
Stamps: Floriculture
Ink: Archival Ink: Coffee; Stampin' Up Old Olive
Paper: Tag, yellow pattern paper
Accessories: White embossing paper, gold bead, clipart by Red Lead, Colorwash spray, Glimmer Mist spray, ribbons.
Wednesday, July 13, 2011
GC110: Gears, Cogs and Watch Bits
This week on Gingersnap Creations we're doing Gears, Cogs, and Watch Bits. Our sponsor this month, Dezinaworld, sent us some great Steampunk collage sheets to use in our art.
I used one of the Steampunk tags (yes, I cut up a tag...gasp!) To make this 3D watch piece. Recently, while I was shopping, I came across these ART PARTS from Studio 490. They are a layered chipboard piece (front & back).
You could use just the chipboard piece out of the bag. I was going for a shiny brass look and used a paint dabber to add the copper paint. After it dried I gave it a little sponged Vintage Photo to take down the brightness a bit.
I simply printed the Dezinaworld tags on copy paper and cut out a portion of the Jules Vern tag for the background. I added in a few watch parts and a light bulb. And done!
I'm not sure what I'm going to do with my Steampunk watch but I'll find something to do with it.
Create your own Gears, Cogs, and Watch Bits piece and posted it on the Gingersnap Creations blog.
You could use just the chipboard piece out of the bag. I was going for a shiny brass look and used a paint dabber to add the copper paint. After it dried I gave it a little sponged Vintage Photo to take down the brightness a bit.I simply printed the Dezinaworld tags on copy paper and cut out a portion of the Jules Vern tag for the background. I added in a few watch parts and a light bulb. And done!
I'm not sure what I'm going to do with my Steampunk watch but I'll find something to do with it.
Create your own Gears, Cogs, and Watch Bits piece and posted it on the Gingersnap Creations blog.
Saturday, April 23, 2011
Tag Tuesday - EASTER
The Easter bunny came early to my house...and left me a carrot!
Or at least that's what I tried it make it look like.
* Carrot clipart from Oxford Impressions. I couldn't find that one in her collage sheets so maybe she's not selling that one anymore.
* Bunny inches/clipart from Etsy - Sainesydney
Stamps: none
Paper: tag, green scrap, black c/s
Ink: Distress Ink: Orange Marmalade; Wild Honey; Vintage Photo
Accessories: clipart, green yarn, Martha Stewart tulip boarder punch, white lace, Orange Peel Stickles, Glimmer Mist: Pearl
* Carrot clipart from Oxford Impressions. I couldn't find that one in her collage sheets so maybe she's not selling that one anymore.
* Bunny inches/clipart from Etsy - Sainesydney
Stamps: none
Paper: tag, green scrap, black c/s
Ink: Distress Ink: Orange Marmalade; Wild Honey; Vintage Photo
Accessories: clipart, green yarn, Martha Stewart tulip boarder punch, white lace, Orange Peel Stickles, Glimmer Mist: Pearl
Thursday, April 7, 2011
Tag Tuesday - POSTCARD CUTOUT
Louise (Kard Krazy) decided to retire from Tag Tuesday. It was one of my favorite challenge blogs. Fortunately, Rebbecca picked up Tag Tuesday! This is my first chance to play since the move. But I just HAD to do this one!
Last year I picked up some vintage postcards at the Farmer's Market here in Woodland Park (Colorado). They've been sitting on my desk waiting for the right moment to use them. This week's challenge is POSTCARD CUTOUT. I admit, I did NOT cut my card but I'll tell you why...
...first, it's a VINTAGE POSTCARD OF PARIS! Furthermore, it's a TWA "Kodachrome" postcard. Too fun - reminds me of my grandpa's slides. Anyway, I wanted to keep the post card intact.
The base is a "postcard" tag that I found in Seattle last summer. It too has been waiting for the right time.
I did some stamp pad rubbing on the postcard tag. The plane is from Tim's new set AIR TRAVEL.
Stamps: Stamper's Anonymous AIR TRAVEL
Paper: postcard tag, vintage postcard
Ink: Distress Ink: Pumice Stone, Faded Jeans, Stormy Sky, Fired Brick
Accessories: Stickers (stamp), bottle cap, twine
Last year I picked up some vintage postcards at the Farmer's Market here in Woodland Park (Colorado). They've been sitting on my desk waiting for the right moment to use them. This week's challenge is POSTCARD CUTOUT. I admit, I did NOT cut my card but I'll tell you why...
The base is a "postcard" tag that I found in Seattle last summer. It too has been waiting for the right time.
Stamps: Stamper's Anonymous AIR TRAVEL
Paper: postcard tag, vintage postcard
Ink: Distress Ink: Pumice Stone, Faded Jeans, Stormy Sky, Fired Brick
Accessories: Stickers (stamp), bottle cap, twine
Subscribe to:
Posts (Atom)